400 Series P-51 Build

Ask other modelers for a little help / knowledge ?

Re: 400 Series P-51 Build

Postby jpuke » Sat Jun 15, 2013 8:30 am

Image
Covered with silkspan, sealed with dope and a thin coat of Krylon

Image
Painted with Tamiya "Gloss Aluminum". Not too much weight added. Next time I'll use colored tissue, the paint get expensive real fast for a model this size. Not a terrific looking model but hopefully it will look decent and fly pretty well also.
jpuke
 
Posts: 75
Joined: Wed May 04, 2011 8:03 am
Location: Lincoln, NE

Re: 400 Series P-51 Build

Postby scigs30 » Sat Jun 15, 2013 10:20 am

Jpuke, Your build looks great. I have never tried using a glue stick with Silkspan, always used dope and thinner. Nice build
scigs30
 
Posts: 844
Joined: Mon Nov 06, 2006 11:31 am

Re: 400 Series P-51 Build

Postby Mitch » Sun Jun 16, 2013 9:05 am

Very Nice and Clean Build. I believe the weight is still okay to be a good flyer in your local fly field. I see one thing that you have not looked at yet is washout. The wingtips should roll up slightly at the Trailing Edge.

When I was at Perris, CA for WESTFAC IV, Don (Editor of National Free Flight Society) worked with me on my planes the night before the WW II Mediterranean Mass Launch. My Mustangs wing was so stiff we were not able to get the desired washout. My Me-109 however was built lighter and thinner and the washout held. I tried to build washout in that model but it was not enough. Don's process was to hold the model over a hair dryer blowing medium hot air over the wing and twisting the wing for the desired effect. The next day his P-47 in Free French colors was lost in a thermal and not recovered (He did not set his DT, De-thermalizer), and I ended up with 3rd Place for my Me-109.

I also flew my P-51 in "WWII" and my Zero in "Battle of Midway", Guillows kits with no modification other than more tan rubber and 9-1/2 inch prop. Both of those planes had a short flight times and I was out in the first of 3 rounds.

Very good build, looking forward to see her in the air!

Mitch
Mitch
 
Posts: 1347
Joined: Mon Aug 22, 2011 9:16 pm
Location: Kent, WA

Re: 400 Series P-51 Build

Postby jpuke » Mon Jun 17, 2013 4:54 am

I built 1/8" washout into each wingtip when I constructed the wings. I've used a "nickel's" worth of washout in my most recent models and that worked well so I used 1/8" for one this big. I'm not experienced enough to trust that I will cover well enough to get the desired washout in so I build it in by placing something (a nickel, 1/8" plywood disc) under the trailing edge corner of each wing tip.

Image
Image
Image

I hate painting. Not my strong suit. I have a younger brother that does plastic models so I outsourced the prop painting to him and I'm going to try to get him to do the canopy.
Thanks for the compliments, I've learned a lot from everyone here.

Jeremy
jpuke
 
Posts: 75
Joined: Wed May 04, 2011 8:03 am
Location: Lincoln, NE

Re: 400 Series P-51 Build

Postby Mitch » Mon Jun 17, 2013 9:51 am

Looking GOOD! I bought a book recently on Mustangs, on the cover is the Blue nose ones just like your model!

Sounds like you have all you bases covered with the washout. With Guillows construction so strong it was hard for me to add any more washout after the model was finished. The wing was too stiff. So a good thing you built it in! :D
Image
Mitch
Mitch
 
Posts: 1347
Joined: Mon Aug 22, 2011 9:16 pm
Location: Kent, WA

Re: 400 Series P-51 Build

Postby Bill Gaylord » Tue Jun 18, 2013 11:03 am

Three grams isn't bad for overall painting. Looks good. Must have sprayed very evenly from a distance for efficient painting. I've done that to reduce weight, and end up needing two cans, as so much of it goes into the air.
Bill Gaylord
 
Posts: 904
Joined: Sun Nov 09, 2008 1:29 pm
Location: Grove City PA

Re: 400 Series P-51 Build

Postby Phugoid » Wed Jun 19, 2013 12:17 pm

Silver always comes up light, the pigment is light and the silver reflects a lot of light making it look dense and opaque.

However It is a git to get too look nice as it shows up every lump and bump but yours looks great.

Andrew
Phugoid
 
Posts: 952
Joined: Wed Jan 20, 2010 8:17 am

Re: 400 Series P-51 Build

Postby Mitch » Thu Jun 20, 2013 9:15 am

I have a question for you and anyone else here. Here is my Mustang getting ready for WESTFAC IV:
Image
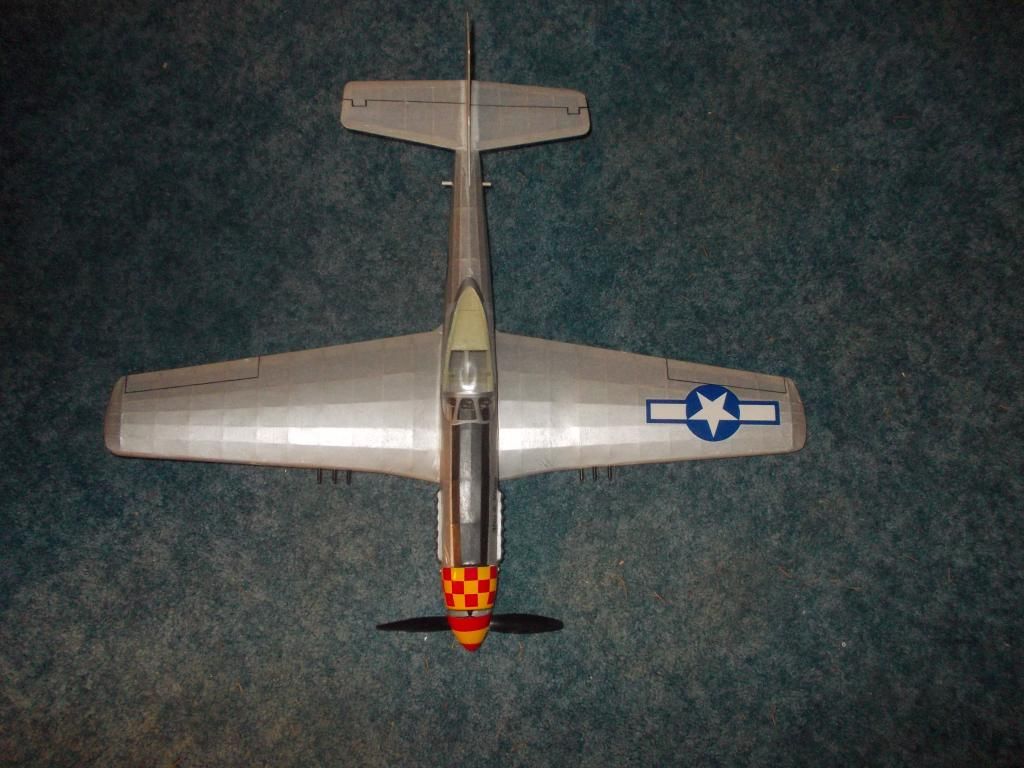
As you can see the canopy has a dent in the top. I believe this is from the packaging as everything in the box was a tight fit. I recently got another Mustang and have the same problem...

Can this be worked out slowly with a Heat gun or hair dryer?

Also... I see you too did not install the wing faring. I usually do not do those, but I did install a small gusset at the TE of the wing at the fuselage. This was to pass "Pilot Pre Flight Inspection" for the "Mass Launch, WW II" My mg's also are just a bit too long.

My model weighs 100 g ready to fly and although flies in my local school yard did not do well at the contest... But it was the ONLY silver plane in the line up and I did get compliments on the covering... SILVER lite tissue from EasyBuilt.

I am looking forward to seeing your model completed!

Mitch

PS Also my rear peg is too far back... My new construction or rebuilds the peg is FORWARD of what is shown on the plans. Keep ALL the rubber centered over the CG of the airplane, or close to that.

I say... "KEEP BUILDING, KEEP FLYING, KEEP LEARNING" :D
Mitch
 
Posts: 1347
Joined: Mon Aug 22, 2011 9:16 pm
Location: Kent, WA

Re: 400 Series P-51 Build

Postby jpuke » Mon Jun 24, 2013 5:18 am

I skipped the wing fairing, I was going to give it a try but the two wing fillets that come from the Guillows kit were so crunched/crushed that I didn't bother keeping them when I was cutting out the parts. Only when I got to the end did I realize that there isn't a replacement plan for those parts on the plans so I was stuck. I don't know how to help with the canopy but it's interesting that you want to fix yours. Can you see the problem with mine in the photos below?

Image
Image

If you guessed that it's the wrong canopy for a P-51 you are correct. At some point, when I was young and buying a bunch of kits regularly, I must have been looking at my P-47 and P-51 at the same time and I ended up swapping the canopies and putting them in the wrong boxes. My younger brother (he's a P-47 nut) pointed it out. It took me a long time to mask the darn thing and finally paint it, now I have to repeat it with the correct canopy. Aaarrghhh!
jpuke
 
Posts: 75
Joined: Wed May 04, 2011 8:03 am
Location: Lincoln, NE

Re: 400 Series P-51 Build

Postby Marshdweller » Tue Jun 25, 2013 2:35 pm

Mitch - I also have a slightly dented canopy in my 400 series P-51. I'll be interested to see what solutions are suggested :)
Marshdweller
 
Posts: 34
Joined: Wed Aug 15, 2012 3:23 am

Re: 400 Series P-51 Build

Postby ADW 123 » Fri Jun 28, 2013 9:58 am

Call guillows cust service and tell them their packaging is bad and that you want a new one sent to you... Im sure they will take care of you
ADW 123
 
Posts: 1158
Joined: Mon Feb 22, 2010 5:22 pm
Location: Cincinnati, Ohio

Re: 400 Series P-51 Build

Postby Mitch » Fri Jun 28, 2013 10:55 am

I think the "new" boxes are just a bit thinner. The supplies are packed in there quite tight. My feeling is the canopy goes in and is still warm and gets squeezed , causing the dimple on top. I have built the Mustang from the "old" packaging and do not remember that problem. I recently got a new Mustang kit and the canopy has the same problem. I will attempt the "fix" it with some hot air. We can start a different post on "Canopies" Mitch
Mitch
 
Posts: 1347
Joined: Mon Aug 22, 2011 9:16 pm
Location: Kent, WA

Re: 400 Series P-51 Build

Postby jpuke » Mon Jul 01, 2013 7:33 am

Image
Well, here it is. Finished as much as I plan on doing. I had to use a bunch of lead shot to balance it out, I hid the shot inside the exhaust pipes by filling them, coating it with CA glue and then sanding them flat before gluing to the fuselage.

Image

WOW!!! What a disappointment! I was hoping for much lighter but I didn't really try too hard to keep it light. I was trying to see what would happen if I built it to Guillows specs. I tried a couple of test glides, one was beautiful and the other ended in a wingover into the ground. I'll need to find somewhere with long grass so I don't break the thing quickly.

It's a little nose heavy with the spinner and prop attached but I'm hoping the rubber will balance it out almost perfectly.

Do I do the test glides with or without the prop attached? I was trying it without to start with.
jpuke
 
Posts: 75
Joined: Wed May 04, 2011 8:03 am
Location: Lincoln, NE

Re: 400 Series P-51 Build

Postby Mitch » Mon Jul 01, 2013 8:44 am

The model looks VERY nice. It would be nice if it flew, but at that weight... I just don't know. My Mustang is at 100g and had nice flights with the Guillows rubber. When I put in the tan rubber the performance dropped. I think my model was too heavy for the soft tan rubber. You can also add more stands. There are different combinations with props too. I think the Guillows grey rubber is stronger and give a short flight but more power. I do not know for sure, that is just my feelings. Mitch
Mitch
 
Posts: 1347
Joined: Mon Aug 22, 2011 9:16 pm
Location: Kent, WA

Re: 400 Series P-51 Build

Postby jpuke » Mon Jul 01, 2013 11:18 am

Thanks Mitch, I think it looks OK. As the builder I know its flaws and hate them all. You can see on the canopy where the blue dope wouldn't stick to the silver acrylic, which is the same problem I had when painting the nose. I won't do that again.

I think I can put enough power into it. I'm going to go with a couple strands of 1/4", well lubed, wound only when I have a blast tube and see where that goes. I hope to get a couple of flights in this weekend - is there a way to post videos directly on this board?
jpuke
 
Posts: 75
Joined: Wed May 04, 2011 8:03 am
Location: Lincoln, NE

PreviousNext

Return to General Building Questions

Who is online

Users browsing this forum: No registered users and 22 guests