Kit No. 4401 FLY-BOY
No. 4 of Beginner's Series
Wing Span: 21" Length: 20 1/8"
Wakefield, MA 01880 U.S.A.
ww.guillow.com
Copyright 2000 by PAUL K. GUILLOW, INC.
Build the other kits in this series and continue to “step your way up” to great model building and flying.
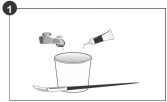
Just about any type of glue will work with your model - white glue, wood cement, "super glue", etc. The building time will vary depending on the glue you use and how fast it dries.
The rubber motor will last a lot longer if you lubricate it. You can make the lube by mixing one part glycerin to one part green soap. KY jelly is also a fair lube. These products are available at your local drug store. Put a few drops in your hands and rub into rubber
|
Building and flying your own balsa model airplane can be one of the most interesting and enjoyable hobbies, providing you spend the time necessary to do a good job. This Guillow model is especially designed for ease of assembly and good flight performance, you can enjoy both if you follow the special build-by-number instructions that have been developed by Guillow model engineers as an aid to a new model builder. Experienced
|
|
model builders will find this "Fly Boy" model simple to build and a joy to fly. You too can have the same success if you work slowly and carefully making sure that each separate job is complete before attempting the following step.
Good luck and good flying!
|
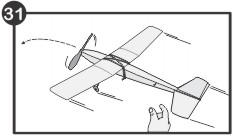
Your model will have a longer flight if you fly it out of your hand.
The take off from the ground needs that first burst of power and uses a lot of energy.
Flying performance will depend on the rubber motors that you use. One - 24½" loop will give you a long slow flight. Two - 24½" loops will give you a faster shorter flight. Need to replace your Rubber Motor ? You can order more through Guillow's
Ok, all your parts are covered with tissue and ready to assemble, glue the rudder onto the fuselage. Be careful and make sure that it is on straight. Glue the tail skid (R2) onto the bottom of the fuselage.
OK, you need to get ready to put tissue covering on the surfaces. Before starting to tissue, make sure your glue has dried well and you have sanded your pieces. (1) Get a small paintbrush out and mix up a 50% water - 50% white glue mixture in a small cup. Stir it well. The tissue pattern below shows how the tissue should be marked with a soft pencil prior to cutting to get enough pieces to cover all parts. Cut the slightly oversized square sections apart with some scissors to have ready to glue to frames using the glue mixture. (2) Brush glue mixture onto the perimeter edges of the frame. (3) Immediately set tissue on glued frame BEFORE it has a time to dry and smooth flat with finger tips. Paint another coat of glue mixture through the tissue so you get a good strong bond. (4) Trim off overhang with modelers knife. Sandpaper can be used if knife is not available. Apply coat of glue mixture to trimmed edges and smooth down any loose tissue with finger tips.
Once your model is assembled "mist" your tissue with a fine spray of water. This will cause your tissue to shrink a bit and tighten, removing most wrinkles and imperfections, leaving you with a nice smooth surface.
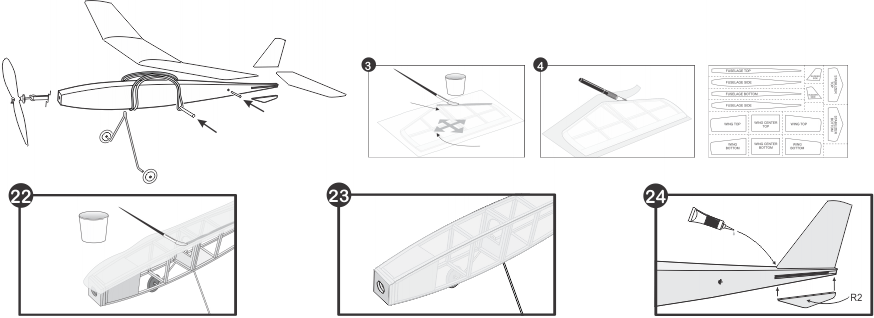
Now build the landing gear by putting the 1" wheels on the ends of the wire gear and bending the end 90o with some pliers so the wheels won't fall off. Slide the completed wire landing gear up into the slot in F7 and glue in place. Use plenty of glue, this landing gear will be under some stress on landings.
Let's start the fuselage, PIN the parts down to a “building board” as you did with the wing. Start with F4 and F3, then (using the 3/32" x 15" stock) you can pin the two longerons in place and glue to F4 and F3. Hint; use lots of pins on the inside of the longerons to help form the nice smooth shape of your fuselage.
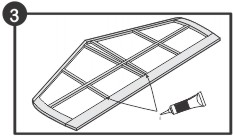
When the wing frames are dry, lightly sand any rough surfaces smooth. Lay the two frames over each other and glue the very rear of part F4 (not the whole piece). Glue JUST enough to hold the pieces together for the next step, then you will be able to go back and put more glue on to strengthen the bond.
Cut to size, glue and pin in place all of the uprights. When dry remove from plan. Two of these fuselage sides are needed . It is time to build another exactly the same as the one you just finished.
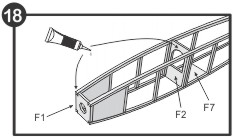
Is the glue dry from step 17 ? Spread the 2 fuselage sides apart a bit and add F2, F7 and glue in place. When dry install and glue F1 to the front. Your fuselage has now "taken shape", let the glue dry thoroughly before proceeding. Hint: Rubber bands around the fuselage can help hold parts in place while the glue dries.
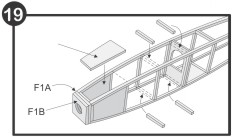
Glue F1A and F1B together, making sure the wood grain runs opposite to each other, and then glue to the front of F1. Install F5's (top and bottom) to complete the "nose" of the fuselage. Cut to length and glue all top and bottom cross-braces between your fuselage longerons.
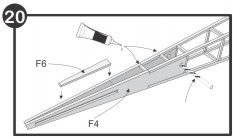
Slide the F6's (top & bottom) in between the F4's to strengthen up the tail section of your fuselage. Glue in place. Finish installing your top and bottom cross-braces between your fuselage longerons. Using a 1/8" drill bit (or small nail) widen out the punch marks in F4 to accept a 1/8" dowel.
Paint glue
mixture through
tissue.
Use ½ water
and ½ white glue
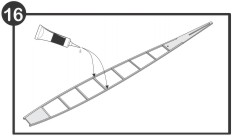
It's time to put your rubber band motor into the model. Tie two 24 ½" loops of rubber and insert them (knot end first) into the opening in the nose of the fuselage. The other ends of the rubber motor are looped around the hook on the propeller assembly. See step 27 to continue.
Now let's put the wing on to make your model complete !!! Loop the two 7" rubber bands over the fuselage. Hold the wing centered just behind the landing gear and then stretch rubber bands over the wing and down onto the 2" dowel behind the wing. This will hold the wing securely yet allow adjustment.
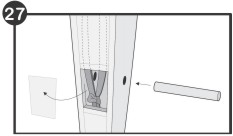
Once the rubber motor is fed down into the fuselage past the dowel holes you can insert the 1/8" x 2" dowel through to hold it in place. Hint: You can cut out the BOTTOM square of tissue by the dowel holes to make this easier to see and get your fingers into, it will not affect the flight of your model.
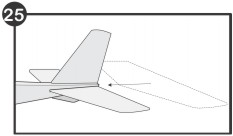
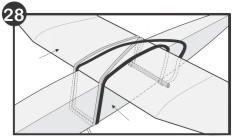
Your Fly Boy is finished and you are ready to balance it and test fly! Balance the glider as shown by putting a finger under each wing tip where shown by the black arrows on the side view. Pick it up, the fuselage should "hang" level. If needed, slide the wing towards the nose or tail until the plane balances level.
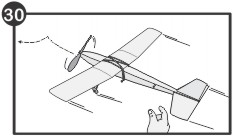
If your model dives, slide the wing forward some to achieve a nice level flight. Once your model is gliding well, you can wind the rubber more turns to get a longer, more exciting flight. Go up 25 winds at a time until you get a nice long flight without putting too much strain on the model. Have fun flying !!!!!!!
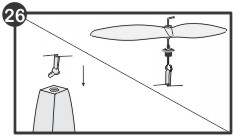
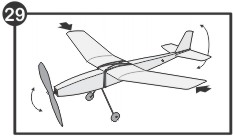
Your Fly Boy is ready to fly ! Wind the prop about 50 turns and let's give it a test flight. The model should "sail pretty" but if the flight is kind of bumpy or has dips, slide the wing BACK on the fuselage and try another test flight.
TWO fuselage
sides needed
Widen holes in
F4 to 1/8"
It is time to tissue cover the fuselage. Start with the top of the fuselage and follow the directions to the right on how to apply the tissue. Remember to work carefully.
Paint glue
mixture through
tissue.
Now finish covering the other 3 sides of the fuselage. The bottom of the fuselage will have to be covered using two pieces, one from the nose to the landing gear and another from the gear back to the tail. Trim off excess tissue once glue is dry.
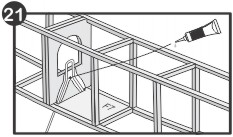
Remove the end section of F4 at the fuselage tail by cutting it out with your hobby knife (See side view on plan). You now have an open slot to slide in the stabilizer. Test fit and make sure it's straight first before gluing in place.
Slide Stabilizer
into Fuselage
Remove from
BOTTOM
of fuselage
Insert 1/8" x 2"
dowel thru
fuselage
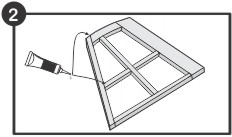
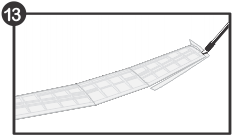
Un-pin and pick the wing frames up from the building surface. Carefully sand the trailing edge of the wing as shown so that the edge becomes thin, then round the leading edge with your sandpaper. See the airfoil shape below.
Cut to length and glue in place both 3/32" stringers. Glue W9 on top of W8 and against W7
Pin the 3/32" sq. spar in place, then glue and pin ribs W7 thru W3. You will have to slightly sand the leading and trailing edges to get a snug fit.
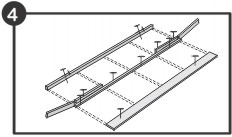
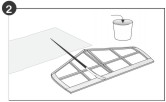
You will need to PIN the parts down to a “building board” to hold them during construction (while the glue is drying). By pinning them as shown above, you will get nice un-warped finished parts. Hint: Lay a piece of wax paper over your plan before you start building so the glue won’t get stuck to the paper. A cardboard box, ceiling tile or a soft wood board can be used to build your model on.
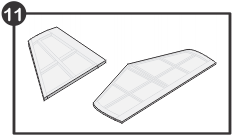
Build the stabilizer over the shaded part of the plan below, as you did the rudder. Don't forget to follow the red numbers and use plenty of pins to hold your stabilizer flat while the glue is drying. Gently sand these parts smooth after the glue has dried.
Build the Rudder over the shaded part of the plan. Lay wax paper over the plan first so the parts will not get glued to the paper. You can follow the red numbers on the plan below for a recommended building order !! Carefully cut parts from 3/32" sq. balsa wood sticks (NOT 15" sticks). Glue all wood parts together, using pins as shown in step 1 to help hold the parts down.
Build the wing center section over the shaded part of the plan. The first step is to pin down the leading edge, trailing edge, bottom spar and Wing Braces over the shaded part of the plan. Use pins as shown above to hold the parts in place.
Now you can glue in the wing ribs and top stringer on your wing center section. When the glue is dry, sand your wing frame smooth and shape leading and trailing edges as shown above. Your wing center section is now done.
Now it's time to build the left and right wings. Steps 6-9 show the construction of the left wing, the right wing is built in the same manner. Pin trailing edge, W8 and leading edge down to your work surface and glue together.
Now it's time to cover your stabilizer and rudder with tissue. Follow the instructions provided on the other side of plan. Additional instructions are included in the catalog flyer supplied with this model kit.
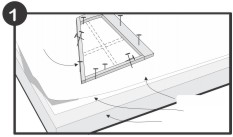
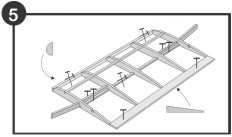
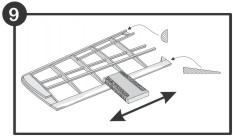
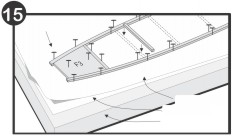
You now have completed all three wing sections. To join the sections, pin the center section to the board. Using the dihedral gauge placed under the wing end, glue where the two wing sections meet. Use a liberal amount of glue
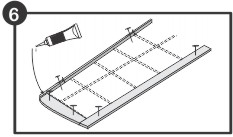
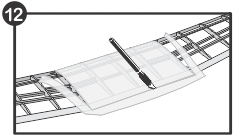
To cover the wing, first cover the top of the center section then the top of the two wing panels. When covering the two wing panels, slightly overlap the tissue onto the center section. Use the diluted glue mixture to smooth the tissue where it overlaps. Take your time and do a neat job.
Trim any excess tissue from the wing frames. Use extra caution and a sharp blade. On any rough edges wet your finger with the diluted glue and rub the glue onto the rough spot until it
smoothes out.
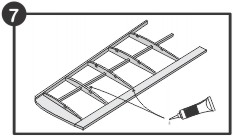
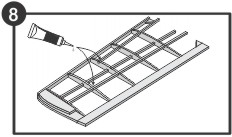
Repeat the covering process on the bottom side of the wing. Cover the center section first then the two wing panels & cut off excess tissue. Your wing and tail sections are now finished, time to start on the fuselage on the other side of this plan !
Use Dihedral Gauge
to set correct wing angle.
IMPORTANT: 15" x 3/32" sq. are to be used to construct the fuselage only. Do Not use on wing and tail sections.
Wings, Stabilizer and Rudder Instructions
Fuselage Instructions & Completing the Model