Kit No. 4201 CADET
No. 2 of Beginner's Series
Wing Span: 14¼" Length: 12”
Wakefield, MA 01880 U.S.A.
www.guillow.com
Copyright 2000 by PAUL K. GUILLOW, INC.
While the glue is drying, start making the Fuselage of the Cadet. Carefully cut the back end of the stick to look like the Side View at left. Hint: Hold wood over plan and mark with a pencil.
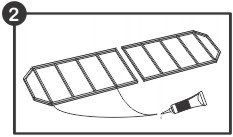
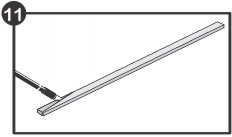
You now have a completed Wing Slide. This Slide needs to be strong to support the wing so put an extra coat of glue on the joints now. Set aside and let dry.
Don't forget this
side too!
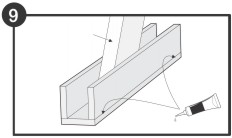
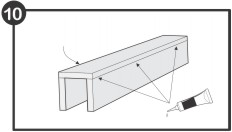
Now you need to glue the 3rd piece onto the other side. Use the body as a gauge (as shown) to get a good SNUG fit. Make sure you slide the Fuselage back out before the glue dries !
Use Fuselage
(body) to gauge
the thickness!
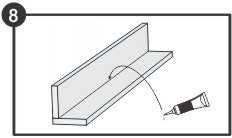
Take 2 pieces and glue one over the edge of another so it looks “L” shaped. Make sure the glue dries with the pieces at a 90 degree angle!
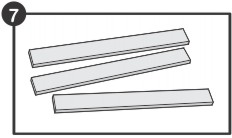
You need to start building a Wing Slide from the ¼" wide balsa strip in the kit. Cut 3 pieces the same length as the wing slide shown in the side view (about 2½” long).
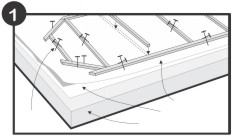
You will need to PIN the parts down to a “building board” to hold them during construction (while the glue is drying). By pinning them as shown above, you will get nice un-warped finished parts. Hint: Lay a piece of wax paper over your plan before you start building so the glue won’t get stuck to the paper. A cardboard box, ceiling tile or a soft wood board can be used to build your model on.
When the wing frames are dry, take them off the plan and lightly sand any rough surfaces smooth. Place the dihedral stick (see above) under the one wing tip to hold it up at the correct angle & glue the wings together.
Build the left and right wings over the shaded part of the plan. Lay wax paper over the plan first so the wing frames will not get glued to the paper. Carefully cut parts from 3/32" sq. balsa wood sticks. Glue all wood parts together, using pins as shown in step 1 to help hold the parts down.
Build the stabilizer over the shaded part of the plan as you did the wing frames. Don’t forget to use wax paper and plenty of pins. Gently sand the stabilizer smooth after the glue has dried.
Now build the rudder of the Cadet the same way. Take your time & do a neat job! Gently sand.
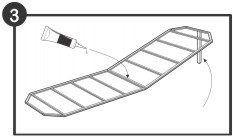
Build the wing support next, remember that this has to be strong enough to hold up the wing on your model so use plenty of glue. Note: The 2 pieces of wood indicate the front of the wing mount!
FLYING HINTS
1. If the model is climbing steep and suddenly begins to fall - move the wing back until it flies evenly.
2. If the model does not want to climb - move the wing forward.
3. If the model turns too much to the right or left, take the rudder off and glue it back without the right or left offset.
IMPORTANT
2 sticks go
towards the
front of plane.
Glue the thrust bearing on straight to the bottom of the front end of the fuselage (see plan). When it’s dry, wrap it with thread and coat the thread with glue to make it strong. This nose bearing will be under some strain when the rubber motor is wound.
Trim off
extra string
AFTER
glue has
dried!
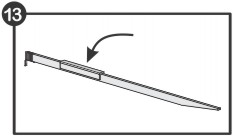
Now that the glue from step 10 is dry, test fit your Wing Slide onto the fuselage as shown above, it should be a nice snug fit but be able to easily slide back and forth!
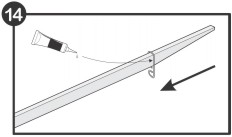
Now slide the rear hook on the fuselage from the back. Look at the side view on the plan to see where it goes. Put glue over the wire to hold in place.
Use plenty of
glue for strength!
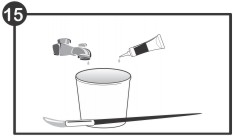
OK, your finished building the parts and need to get ready to put tissue covering on the surfaces. Get a small paintbrush out and mix up a 50% water - 50% white glue mixture in a small cup. Stir it well. Now is a good time to do any last minute sanding!
Use ½ water
and ½ white glue
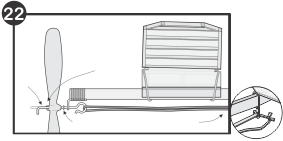
Slide the propeller shaft through the thrust bearing, then add the small washer and propeller as shown above. Carefully bend the end of the propeller shaft 90o with a pair of pliers. Tie a 9" loop of rubber band for the "motor" and place between the propeller hook and rear hook.
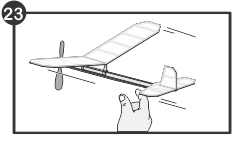
Your ready to FLY !! With the wing in the approx position shown in the side view, give the plane a gentle "test" toss without winding. It should glide gently to the ground, if not, slide the wing & try again until it has a nice level flight. See "FLYING HINTS"
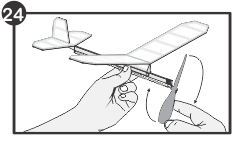
Ready for powered flight ? Wind the rubber motor as shown above (about 100 turns) and let it fly ! Your model should climb up in a gentle right circle and then glide safely back down. When you get it "trimmed" well, try more turns on the motor, HAVE FUN !!!
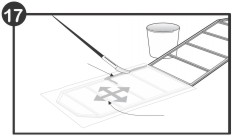
Carefully lay tissue down on the wing half starting at the middle of the wing and “rolling” it out smooth towards the end. Smooth out any big wrinkles with you finger. Paint another coat of glue mixture THROUGH the tissue onto the wood. Let dry !
Paint glue
mixture through
tissue.
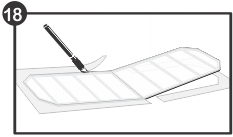
When the glue has dried and the tissue is adhered securely, trim off the excess tissue with a sharp modelers knife or razor blade. Be careful !
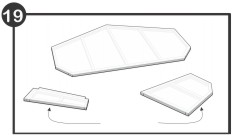
Tissue cover and trim the stabilizer, rudder and wing mount as you did the wing. The stabilizer is covered on the top side only BUT the rudder & wing support should be covered on BOTH sides with tissue.
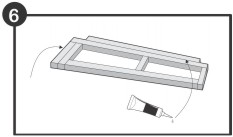
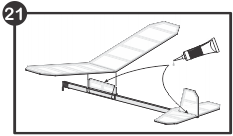
Glue the wing support carefully in the middle of the wing slide. Put the two small rubber bands on as shown to hold the wing support/slide onto the fuselage. Glue the stabilizer to the rear of the fuselage as shown. Take your time and get these on straight!
IMPORTANT
2 sticks on wing
support go towards
FRONT !
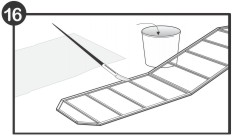
Cut a piece of tissue paper slightly oversized for the wing half. Paint your glue/water mixture on the top side of the left wing as shown above. Proceed quickly to the next step before the glue dries.
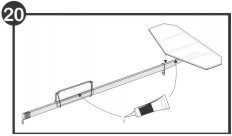
Glue the rudder on top of the stabilizer with a little offset to the right as shown in the Top View, this will give your model a gentle turn! Now carefully glue the wing to the wing support, checking the model from the front for proper line up. If needed, you can support (hold up) the wings with some books or something to KEEP them straight while the glue dries. Take your time and glue well !
Build the other kits in this
series and continue to “step your
way up” to great model building
and flying.
"notched" end
of propeller