Now that it has been sanded, it's time to separate the wing into Left and Right sides. The middle of the wing has already been "scored" to break in the correct place. Put the wing on the edge of a table as shown above and flex the overhanging side down and up until it breaks in two.
Try to do a neat job because the nicer you do your sandpaper work and glue the parts together, the better it's going to fly.
You will be happy you did !
Just about any type of glue will work with your
model - white glue, wood cement, "super glue",
etc. The building time will vary depending on
the glue you use and how fast it dries.
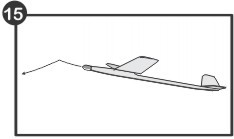
This glider will fly across a big room
with only a little push. Outdoors it
should fly higher and 3 times as far !
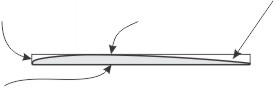
The top is a
little curved
The front
edge is a
little rounded
The back
edge is
sanded thin
If you were to imagine what the wing
thickness should look like when your
finished sanding, this would be it.
This shape is called an Airfoil. If your
glider flies longer and farther than
other gliders, it's most likely because
you've sanded your wing to a good
airfoil shape.
Kit No. 4101 GOLDWING
No. 1 of Beginner's Series
Wing Span: 11½" Length: 14¼"
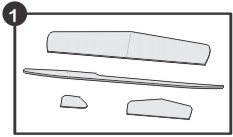
Take a good look at the pre-shaped balsa wood parts. The wing is at the top, the fuselage (body) is in the middle and the tail parts are at the bottom. Carefully follow the step-by-step pictures below to show you how to build these parts into a long flying glider - and FLY it too !!
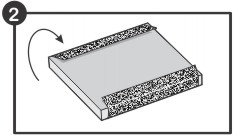
Wrap and crease the sandpaper around the small block of wood as shown in the picture above. This will help you to sand your parts nice and even.
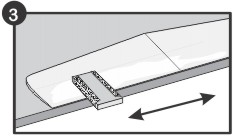
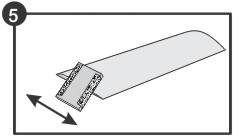
First, sand the trailing edge of the wing as shown so that the edge becomes thin (hint; you can use a table edge as shown above to help your sanding). Then round the leading edge with your sandpaper. See the airfoil shape
below.
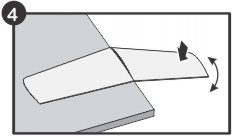
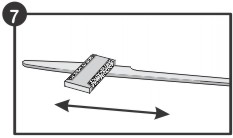
Sand the center of both wings a little as shown so that the dihedral angle (or bend) will be in the wing when you glue the two halves together. Sand only a little at a time off the centers (at an angle!) until they fit well when positioned as shown in step 6.
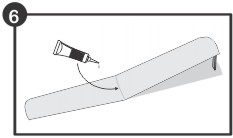
Put glue on BOTH finished wing centers and join them together as shown above. Run your finger down the joint to wipe off any excess glue. Use the "dihedral stick" from the sanding block as a spacer under the one wing tip while the glue is drying. This will give you a finished wing with the correct dihedral.
Sand the fuselage smooth while your waiting for the glue to dry on the wing. Round the edges only a little, don't sand the edges where the wing and stabilizer will be glued (see the side view).
When the wing joint has dried, glue the wing to the fuselage. The front middle edge of the wing goes right above the "punch mark" in the fuselage (see side view). You can slide an object up under the wing to help balance and keep straight until the glue has dried. Look at the model from the front to make sure the wing is straight (see front view).
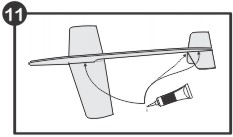
Your model is just about done, put another coat of glue on the joints for strength, under the wing and stabilizer (both sides) and where the rudder attaches to the stabilizer. Let the glue dry thoroughly before flying.
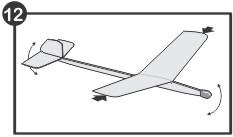
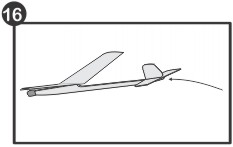
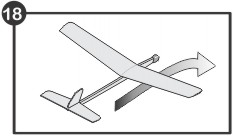
OK, all glued? All balanced? Ready for a test flight?? Hold the glider as shown above with the nose pointing slightly down, now give it a gentle straight forward push.
If the glider is balanced right, it should glide straight and level for about 20 - 30 feet or more before it touches the ground.
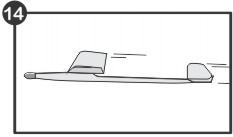
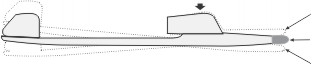
Now that your glider is finished you are ready to balance it (by adding clay to the nose) and test fly! Balance the glider as shown by putting a finger under each wing tip where shown by the black arrows on the top view. Add or remove clay until the glider balances level.
Should the model fly "bumpy" or with a dip it means that it is STALLING. Add a little more clay to the nose until it flies straight and level.
If the glider seems to come down too quick or won't go far at all, then it must be DIVING. Take some clay off the nose, it should level out and you'll get a nice long straight flight.
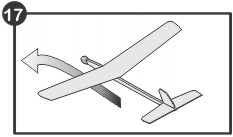
If the glider turns too hard to the RIGHT, bend the back edge of the rudder a little bit to the left to correct the flight.
If the glider turns too hard to the LEFT, bend the back edge of the rudder a little bit to the right. Hint; If you wet the back of the rudder slightly with water the wood will bend easier. Then you can pin (or hold) it in place until it dries. This should straighten your flight out !
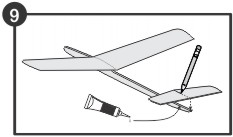
Carefully sand the stabilizer and rudder smooth and round off the edges slightly. When the wing / fuselage joint is dry, glue the stabilizer onto the fuselage. Hint; draw a pencil line down the stabilizer to help make sure it goes on straight. Don't touch until the glue is dry.
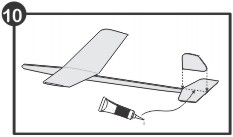
When the stabilizer is dry, glue on the rudder - carefully and straight (see front view) . Hint; use the pencil line you drew on the stabilizer in step 9 to line up to! Let the glue dry!
Wakefield, MA 01880 U.S.A.
www.guillow.com
Copyright 2000 by PAUL K. GUILLOW, INC.