The Blitzkrieg on Poland

Ask other modelers for a little help / knowledge ?

Re: The Blitzkrieg on Poland

Postby Mitch » Thu Oct 23, 2014 2:14 am

Since it is too damp in Seattle to "Dope" I decided to get this skeleton off the shelf and move along with this project. Since WESTFAC V is now about 357 days away...but who's counting.

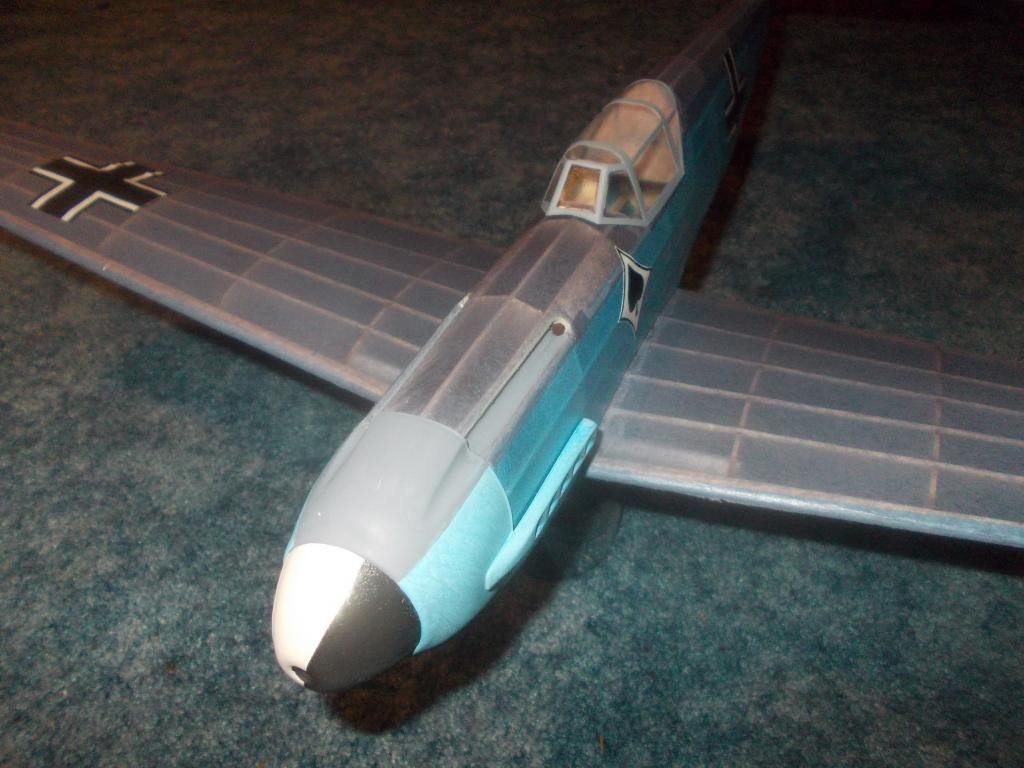
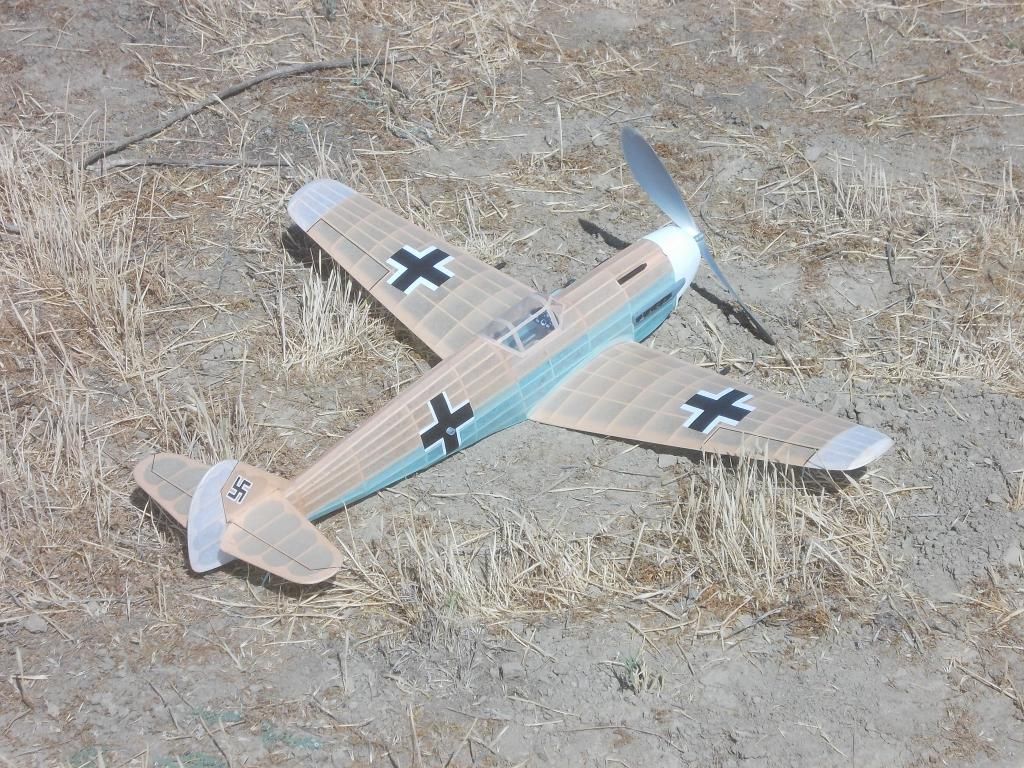
I did some final shaving and sanding on the skeleton, worked on some plastic and covered the wing. This plane is going to be a basic German Grey topsides and Bright Sky Blue underneath.
Image
I just added some extra balsa behind the gun troughs as I want to blend them in. That wood will be sanded down to almost paper thin. And should add a minimal amount to the plane. I am willing to add a bit weight if it adds to the detail.

The skeleton (just the balsa) weighed 26 grams. This is my third generation Me-109. I plan to fly this in FAC competition. Next year at WESTFAC is the "Battle of Britain"

1. First generation = Guillow's kit and built as per Guillow's (and scale wing span). This plane flies with Guillow 7 inch prop and rubber.
2. Second Generation = Guillow's kit and new Wing and lighter tail (with extra wing span as per Guillow's plans) Flew with tan rubber and 9 inch Peck prop.
3. Third Generation = Guillow parts and Lightened structure, used some contest balsa, bent balsa tail, extra dihedral (extra wing span per Guillow's)

Mitch
Mitch
 
Posts: 1347
Joined: Mon Aug 22, 2011 9:16 pm
Location: Kent, WA

Re: The Blitzkrieg on Poland

Postby davidchoate » Thu Oct 23, 2014 10:09 pm

Im on My second generation of Ff planews. Its amazing how much you can do do to improve. I am now using lightening holes, FAI tan, and contest balsa on the tail. I have learned a light tail meansless weight added to the nose to balance. I cant wait to fly My 2nd gen. super cub.
davidchoate
 
Posts: 1263
Joined: Wed Aug 14, 2013 6:41 am
Location: PHiladelphia PA

Re: The Blitzkrieg on Poland

Postby Mitch » Fri Oct 24, 2014 3:46 pm

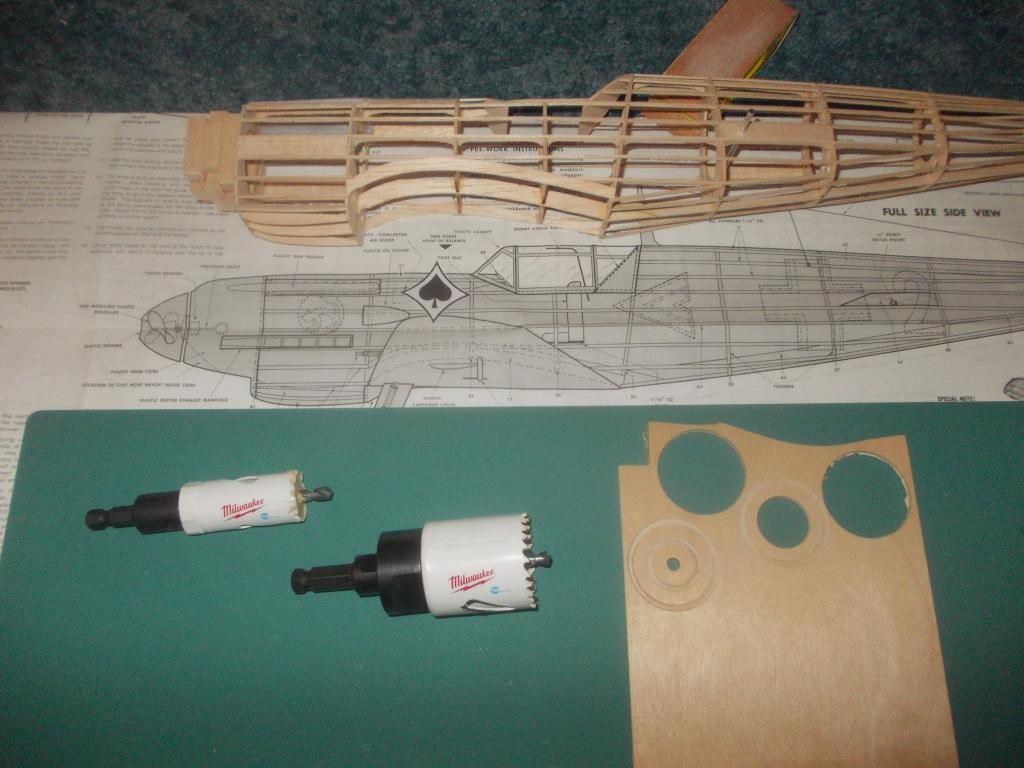
Working on the thrust adjust...

First built up the front end with 1/4 inch stock.
Now making the rings to support the thrust plate.

Image
I am using 2 hole cutters to make what I need. They are a 1 inch and a 1-3/4 inch

I found the insignia I plan to use on the internet at the following site:
http://rhorta.home.xs4all.nl/luftwaff.htm

I copied the insignia and printed and it looks like a good scale to fit.

...and David, Don Ross calls it 'compound interest' for if you save 2 grams on the tail (with an Me109) I can save 4x in ballast, that is 8 grams. I just shaved off 10 grams on my plane!

Mitch

UPDATE:

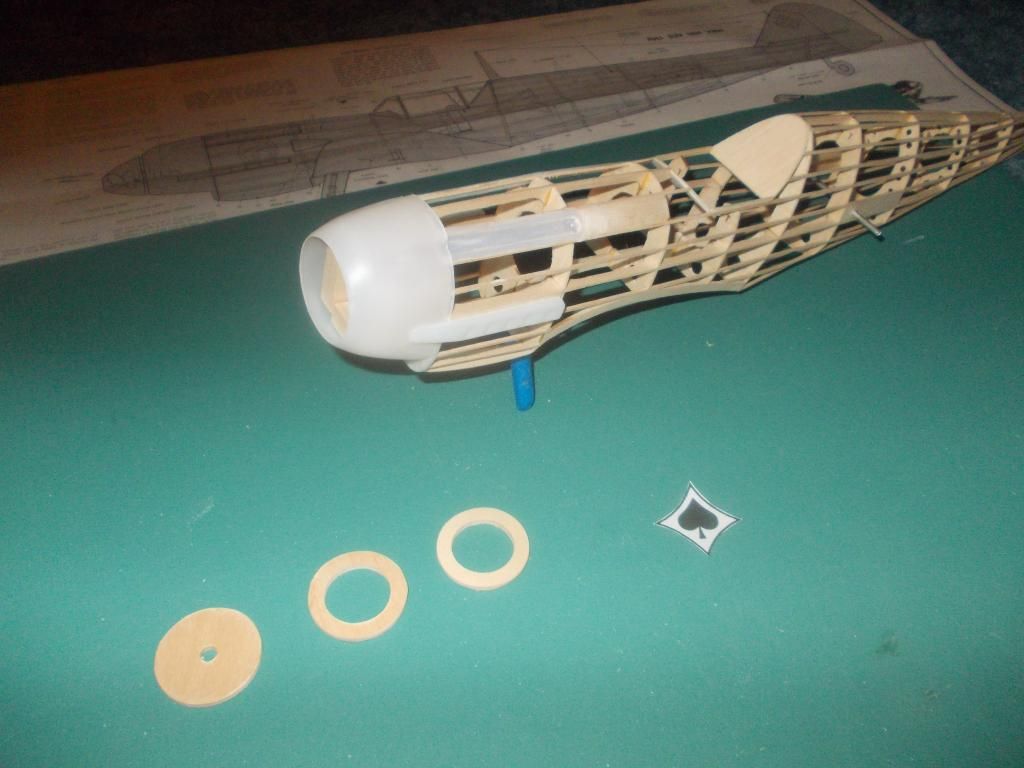
Just finished cutting out my parts:
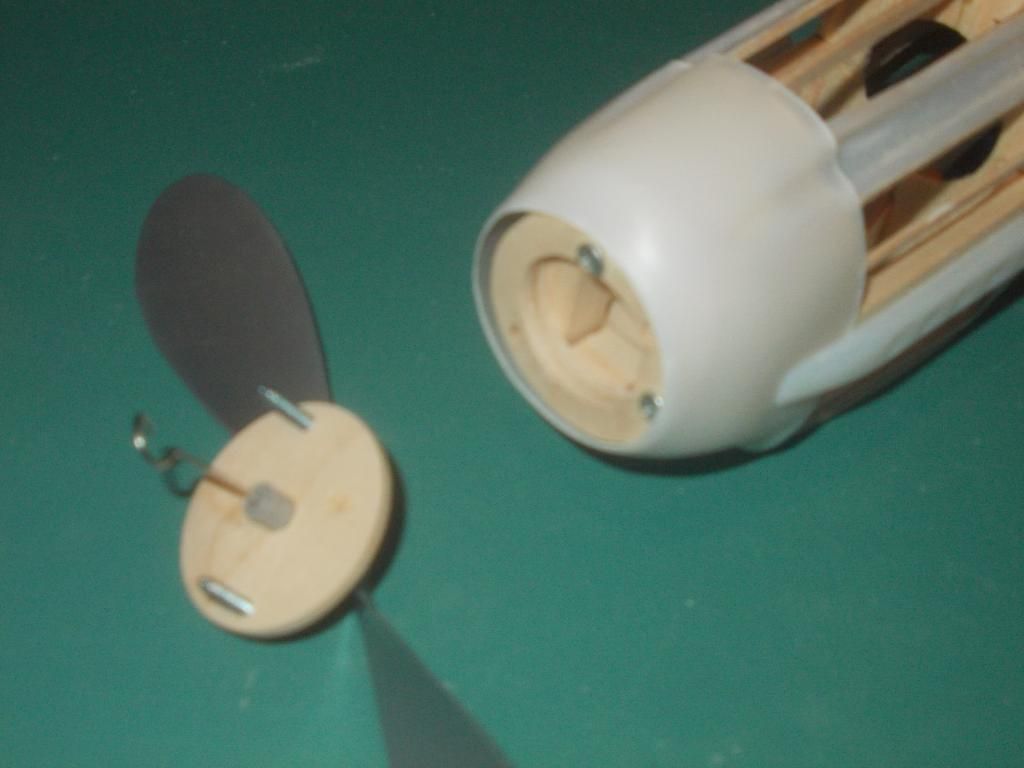
Image

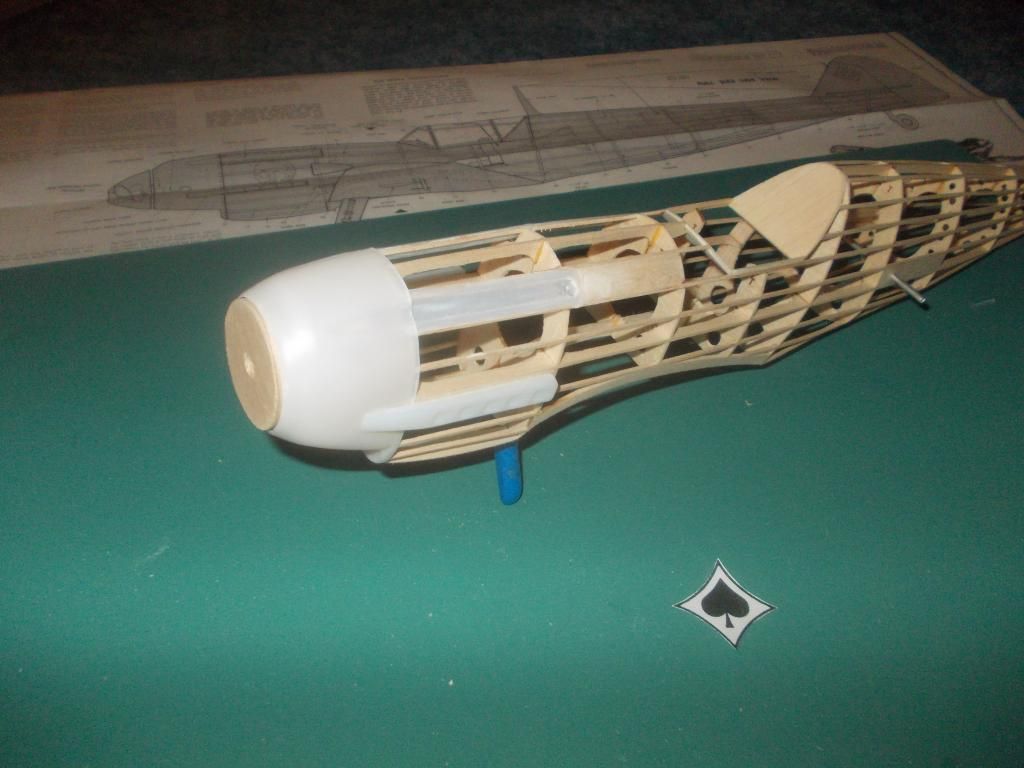
...and assembled it will look like this:
Image

There will be a few screws for alignment and adjustment... I should finish this up by the end of the day...

PS: I only need one ring, but I made 2 as I needed the proper spacing. I will glue those together and then drill my holes for alignment and adjustment. So the rings will be glued in place and the cowling will aslo be glued up on the final plane. The only part that will come off is the front disk that will have the prop and spinner on. I will be able to stretch wing the motor, then easily hook on my prop! :D Mitch

PPS: I decided to move the rear peg just a small distance more forward (It is not in the center of the bay) So the peg will be just forward of the German Cross. The hook to peg distance is 11 inches. I plan to use 4 strands of 1/8 rubber. The length I do not know... I plan to weigh the model and use 30 % total weigh in motor! Mitch
Mitch
 
Posts: 1347
Joined: Mon Aug 22, 2011 9:16 pm
Location: Kent, WA

Re: The Blitzkrieg on Poland

Postby Mitch » Fri Oct 24, 2014 8:34 pm

Okay... I have the two rings glued together. I like the extra thickness as I drill holes and the extra plywood holds up nice.
Image

So I will still need to glue the ring into the plane as that will stay there:
Image
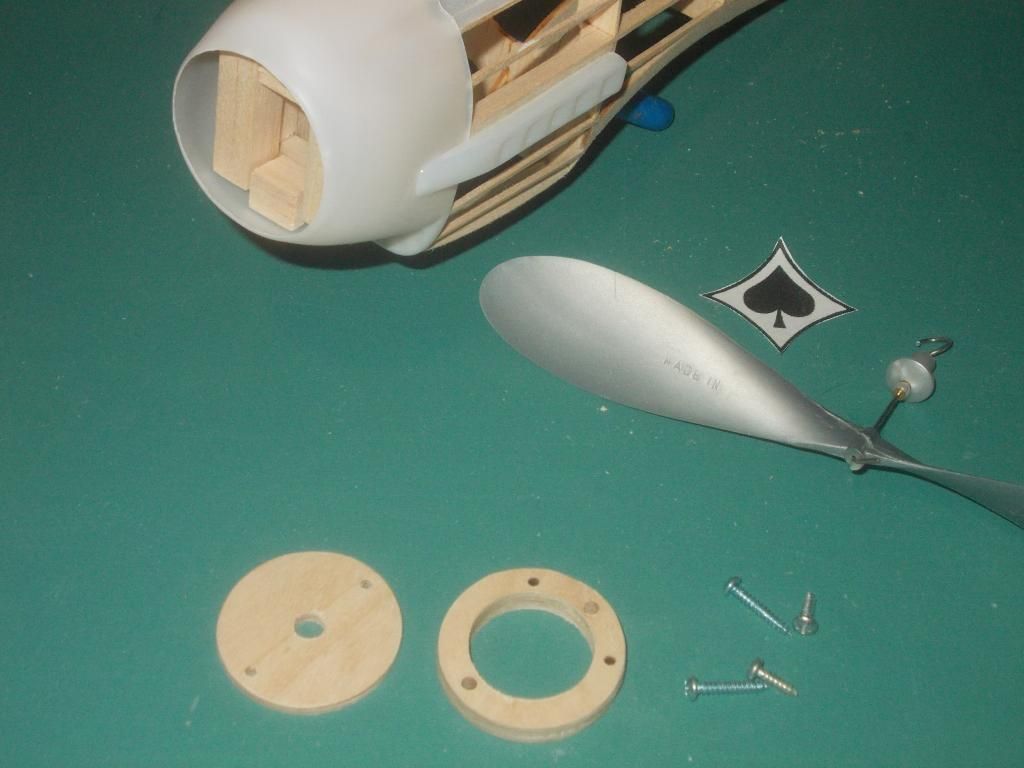
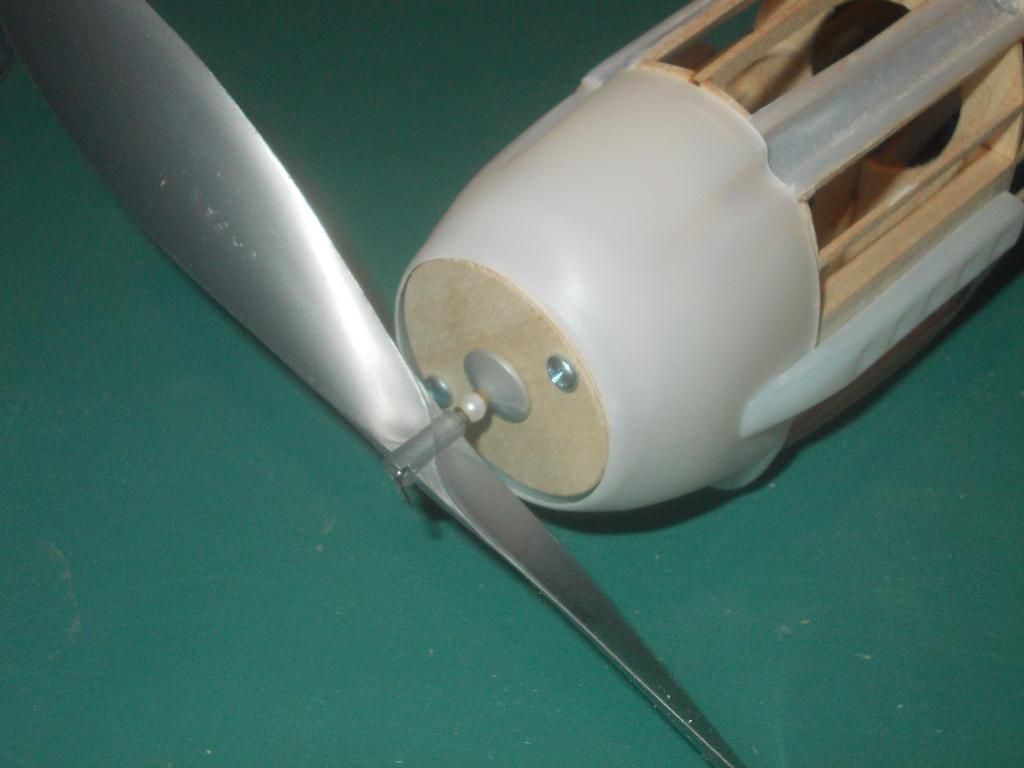
I can back out the screws at 12 o'clock and 3 o'clock to get my 'down' and 'right' thrust.

So when I am winding, the only piece that comes off is the front face plate.
Image
After winding, hook the prop to the motor and insert, and she should be ready to go. These screws stay in the face plate, but the holes in the rings are slightly larger and the screw slide though. These screws just hold everything in proper alignment. I might add a magnet or two so the face plate does not fall out when the rubber unwinds and gets loose.

NOTE: I plan to add a flat washer or two, to the back of the face plate as there is not much room left in the cowling for ballast!

Mitch... Keep Building, Keep Learning, Keep Flying!

PS: As I trim my plane I will keep track of how far out I unscrew the adjustment screws. For display and photo shoots, I can remove the screws altogether so the prop is on straight! :mrgreen:
Mitch
 
Posts: 1347
Joined: Mon Aug 22, 2011 9:16 pm
Location: Kent, WA

Re: The Blitzkrieg on Poland

Postby Mitch » Sat Oct 25, 2014 11:50 am

Just Another Rainy Day in Seattle:

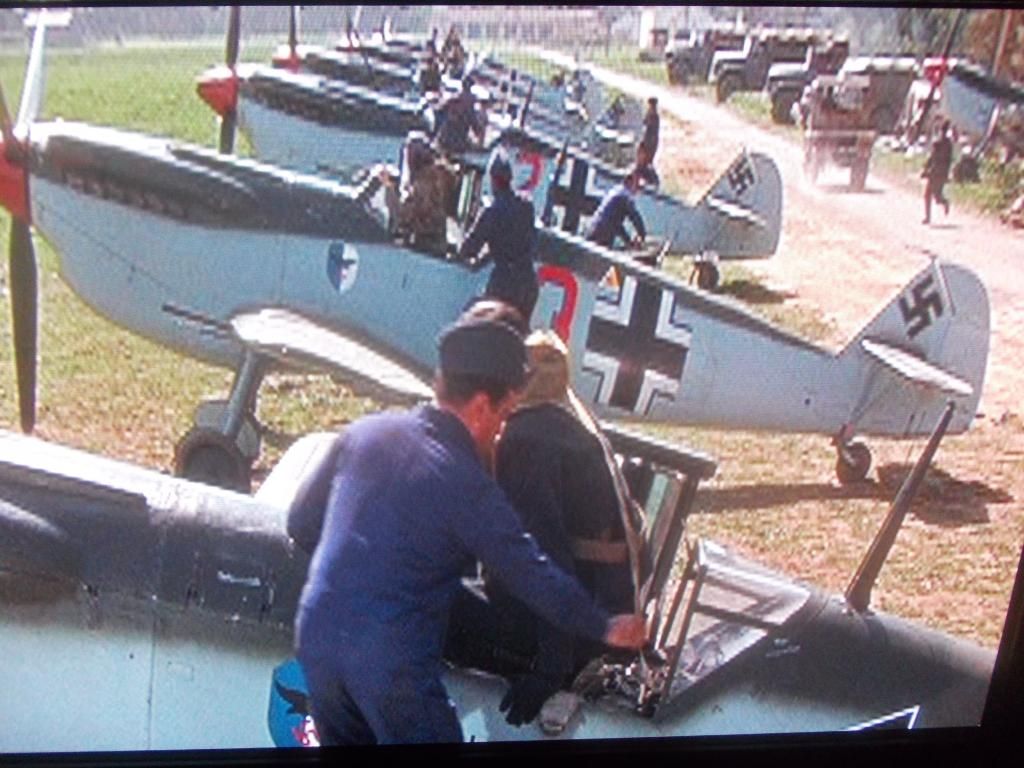
From the movie "Battle of Britain":
Image
these 109's have Merlin Engines, therefore the manifolds on top.

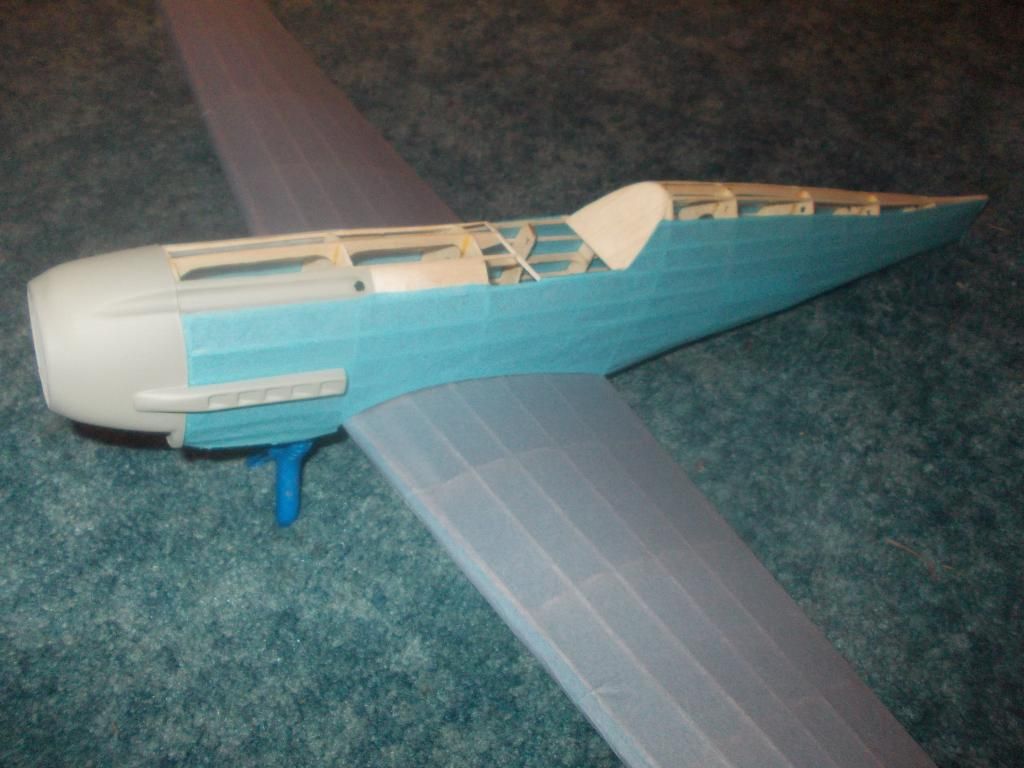
Color scheme for my 109: Sides are covered with one continuous sheet!
Image
I believe the German 109's Mercedes engine is inverted, therefore the exhausts are located lower.

I plan to cover with less than 10 sheets of paper. Guillow's instructions show over 30! :shock:

Mitch
Mitch
 
Posts: 1347
Joined: Mon Aug 22, 2011 9:16 pm
Location: Kent, WA

Re: The Blitzkrieg on Poland

Postby Mitch » Sun Oct 26, 2014 1:44 am

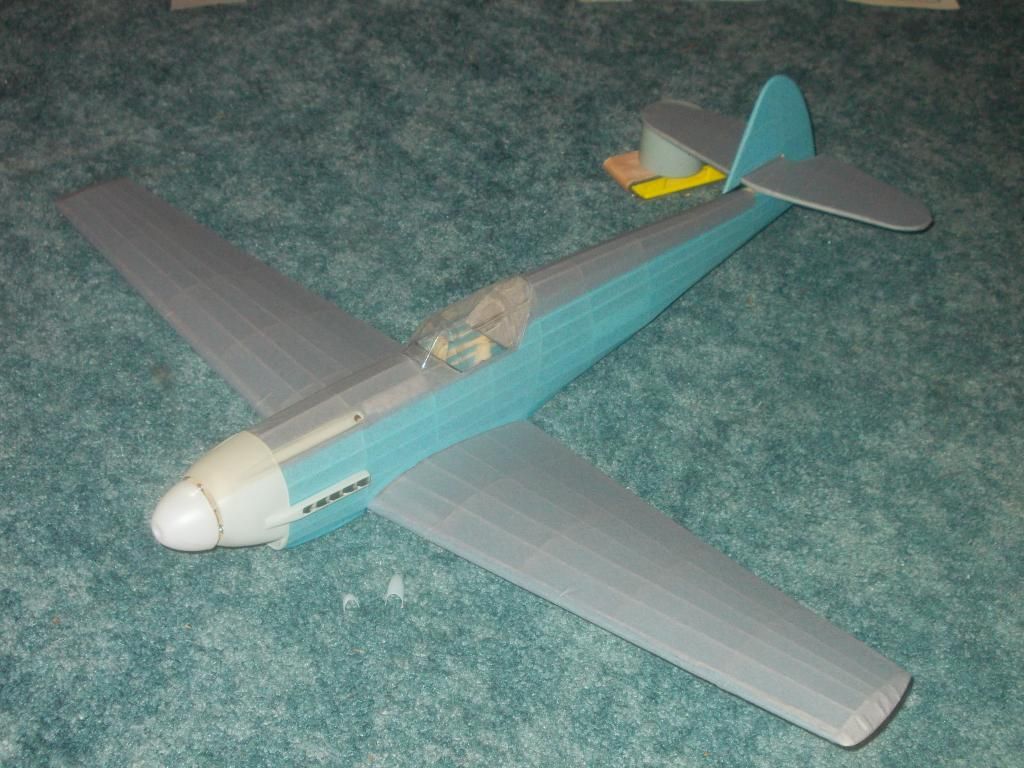
Okay... all is covered... Here are all the parts:
Image
What you see weighs 53 grams.

I need to repaint the cowling. I plan to use my airbrush and try to get a closer color match to the paper. I have a set of Vallejo paints and I bought some Vallejo Airbrush Thinner today. I have not used my airbrush in a long time so I will practice with that first. It is a very basic 1 stage Paasche Airbush. I also need to set up a paint booth.

The cowling was painted with rattle cans of Light Aircraft grey and Luftwaffe blue. This worked okay with my FW as I used a little shade of grey and the light blue paper. I liked the Medium Grey for this project and also tried the Medium Sky Blue. I think I should have went with the Light Sky Blue, but this is what I have now, and I will go with it. Basically, I am using up the paper I have on hand.

I drilled holes in the gun troughs as I plan to install the guns. (FAC rules require to represent all guns).
Still need to dope and add markings.

Mitch

PS: So I think I can finish up this model up and keep her under 60 grams. Pack in about 20 grams of rubber and she is going to be ready for WESTFAC V! :D
Mitch
 
Posts: 1347
Joined: Mon Aug 22, 2011 9:16 pm
Location: Kent, WA

Re: The Blitzkrieg on Poland

Postby davidchoate » Sun Oct 26, 2014 9:45 am

Nice. I dont know how you do it yet, but keeping a 400 109 to 60g's is remarkable. I'm getting there though. Every build I get a bit lighter,and I'm also beginning to understand props and motor length, stab angle, etc. My fai rubber came with these little brass rings. What are they for Mitch?
davidchoate
 
Posts: 1263
Joined: Wed Aug 14, 2013 6:41 am
Location: PHiladelphia PA

Re: The Blitzkrieg on Poland

Postby Mitch » Sun Oct 26, 2014 10:15 am

How I build light:

1. Sand all parts
2. Cut or Drill lightening holes, and use half the wing ribs
3. Use some contest balsa
4. Make bent balsa tail (light and strong)
5. Use a minimum of plastic parts
6. Use colored domestic tissue (no paint on plane)
7. Minimal amount of dope to get the job done
8. Move rear peg forward (Keep center of mass of rubber over CG of plane)
9. Scallop TE of wing
10. When skeleton is finished, sand all over again, concentrating on model behind the rear peg and try to remove 1 more gram

That's about it.

As far as the small washer goes. Look at the picture of my prop. Behind the prop is: washer / bead / washer. This is just to reduce the friction and let the prop spin easier. I remember Guillow's used to supply washers with the kits, but not anymore. On another model I have a small piece of Teflon behind the prop. I think the improvement is minimal... But I am flying in competition. And some contest are won or lost by 1 second.

I am just trying to get my models to have respectable performance.

My number one rule...

1. Have FUN! :D

Mitch
Mitch
 
Posts: 1347
Joined: Mon Aug 22, 2011 9:16 pm
Location: Kent, WA

Re: The Blitzkrieg on Poland

Postby Mitch » Mon Oct 27, 2014 10:26 pm

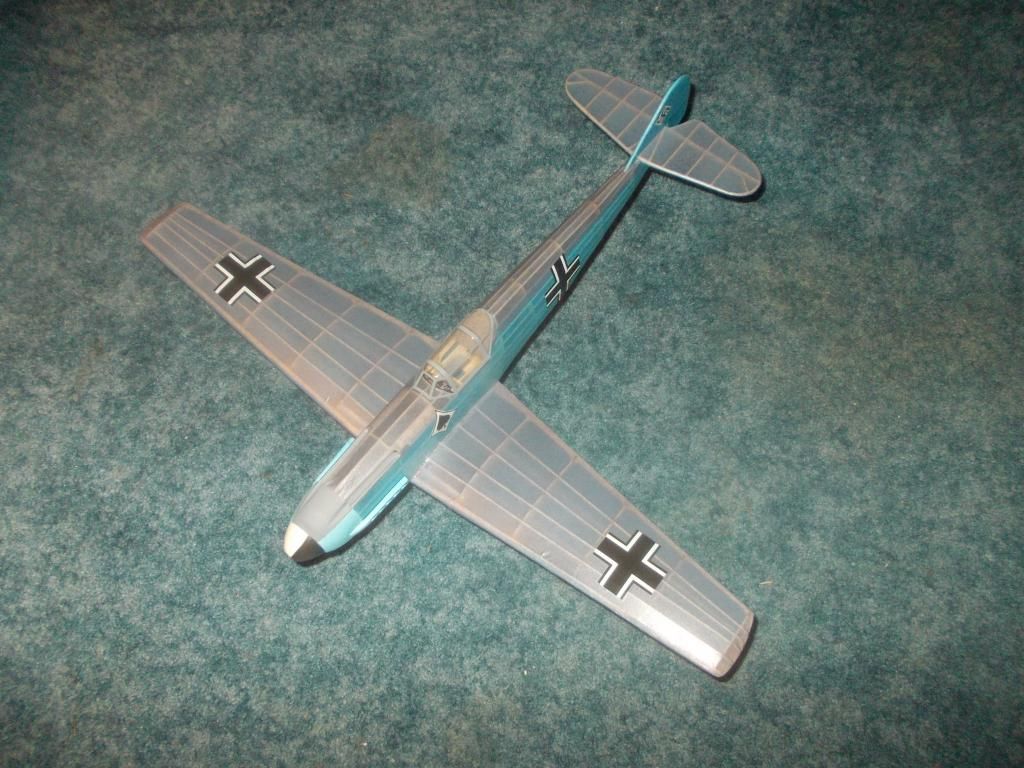
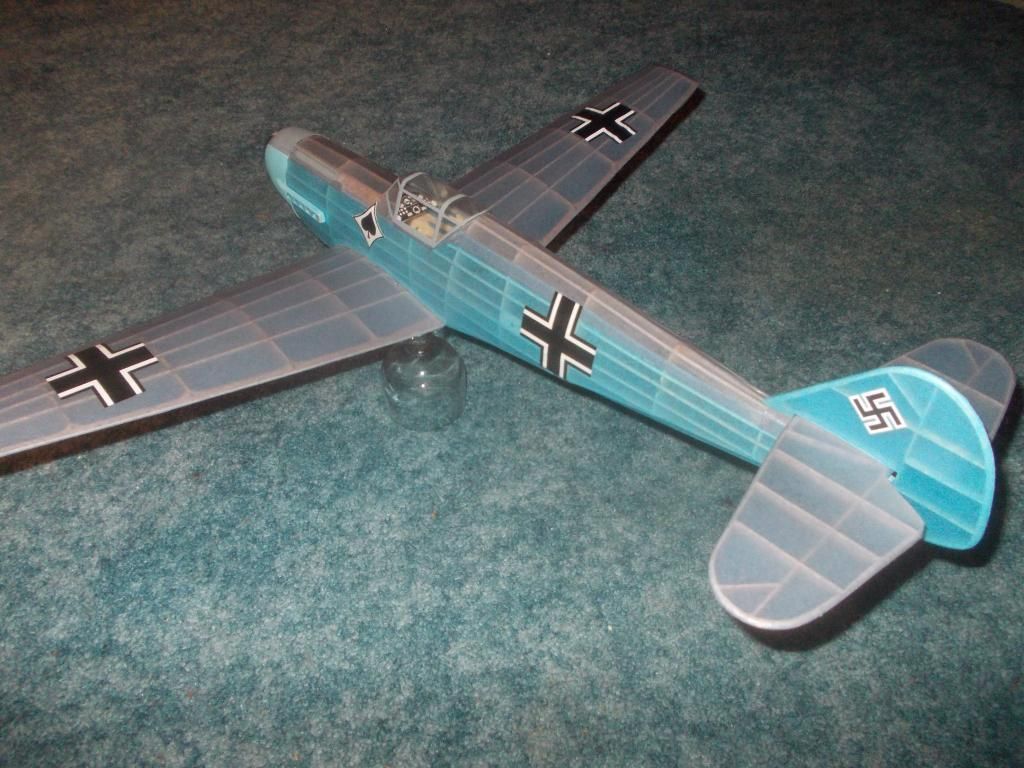
Here she is, almost done:
Image

I tried to airbrush, but ended up brushing on the paint:
Image

I need to attach a few more small parts but she could be ready for test glides:
Image

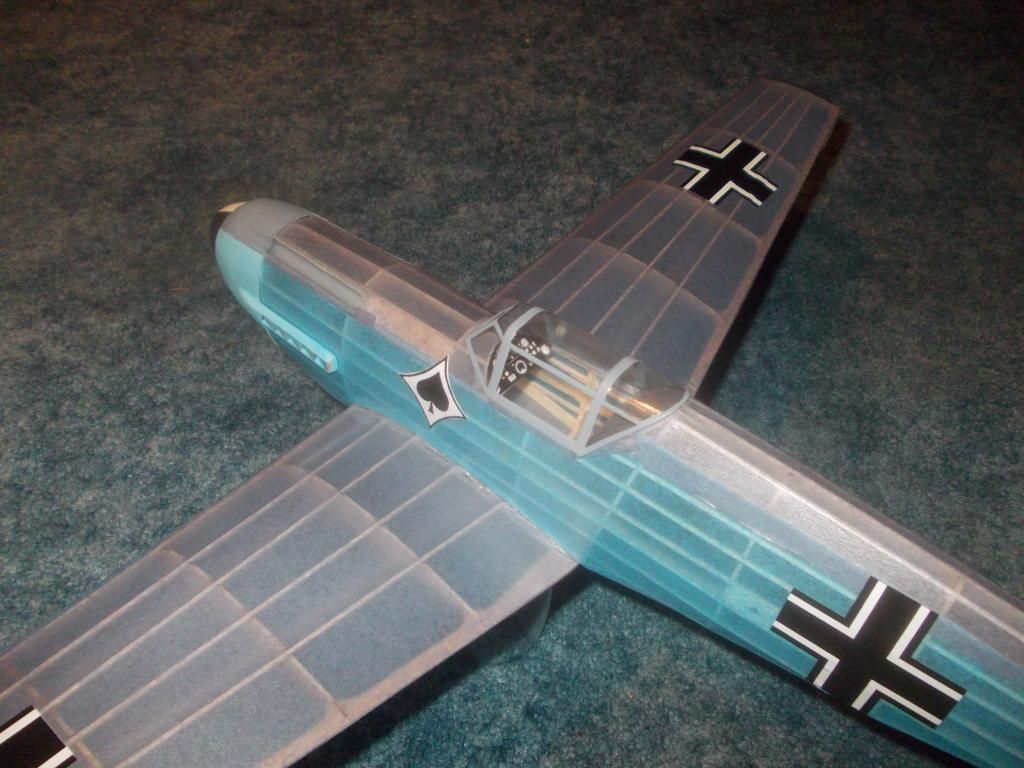
I like the sleek body shape of the 109:
Image

The model weighs 53 grams. Looks like 12 grams for ballast. Total 65 w/o rubber. So I think 25 grams of rubber, total weight of 90 that would be just about 30% of the entire weight of the AUW of the aircraft is in POWER!

Mitch

PS: I have not even seen her glide once and I am thinking of ways to improve this model for my 4th generation...

Keep Building, Keep Flying, Keep Improving...

:oops: OOPS! I forgot about the front nose plate and prop, and those weigh 10 grams! So everything the same, but just a measly 2 grams to ballast! And those are ALL the way forward. I hope I do not have to add ballast to the tail! :shock:

My P-51 "Miss Scarlet" did not use ANY ballast and flew in competition. But this model has a new and improved "NO SLIP" nose block!
Mitch
 
Posts: 1347
Joined: Mon Aug 22, 2011 9:16 pm
Location: Kent, WA

Re: The Blitzkrieg on Poland

Postby Wildpig » Mon Oct 27, 2014 11:02 pm

Mitch wrote:O
So when I am winding, the only piece that comes off is the front face plate.
Image


Mitch,
Is that a glass bead between the propeller and the thrust button?
Do FAC rules allow that?
Wildpig
 
Posts: 529
Joined: Thu Jan 26, 2012 9:41 am

Re: The Blitzkrieg on Poland

Postby Mitch » Tue Oct 28, 2014 2:19 am

Gee you got me on that one... I'll have to check the rule book, but I believe so.

Most guys are running some sort of free wheeling gizmo. So when the rubber winds down the prop starts to free wheel. With a standard setup like mine. When the plane is in the glide stage and the rubber is wound down the prop will start back winding the rubber and cause resistance.

Anyway I will find out before contest time...

Burning the midnight oil... Getting ready for glide test:
Image

With the prop and front plate in I still need 4 grams of ballast. So I glued on a flat washer (2 grams) to the front plate. The marble size rounds of clay weigh about 1 gram each. As do each BB. As you see with my built up front end I have very little room to add weight.

I plan to test glide the model with a blue rubber band just to hold things together. But that will not be flying weight as I will have 25 grams of rubber in the plane. After a few trim flights I will get the proper rubber in the plane and test again. With the longer rubber in the plane I will wind the motor so it is short enough to be inside and then substitute a pencil (or stick) that weighs the same as the prop. And test again. This way I am only testing the glide.

After that is all satisfactory, I will put on the prop and start to wind the motor. The prop you see here is an 8 inch. I could go up to 9 inch.

Today was a nice day... Forecast for the next 5 days...RAIN! :x

Mitch...signing off and good night...
Mitch
 
Posts: 1347
Joined: Mon Aug 22, 2011 9:16 pm
Location: Kent, WA

Re: The Blitzkrieg on Poland

Postby twospruces » Tue Oct 28, 2014 6:06 am

Looking fantastic Mitch.
Seems that another parameter that could be key, in addition to mass, is wing loading. I know you extended the wings; it would be useful to say, by build iteration, if you have been able to reduce wing loading also. A figure of merit there would be interesting to know.

I wonder if wing loading is constant with size of the model or if it scales with reynolds number? IOW, if an effective wing loading for a 400 series applies would be applicable to a 500 series model?

Really nice building! Right now I am making some Lloyd Shales Minnows with my boys. They are really nice little ROG kits.
http://www.endlesslift.com/2011/06/minnow-r-o-g/

Steve
twospruces
 
Posts: 96
Joined: Tue Nov 20, 2012 9:27 pm

Re: The Blitzkrieg on Poland

Postby Wildpig » Tue Oct 28, 2014 8:55 am

Far as I know, wing loading is the same parameter in all scales. Reynolds Number has no effect on it.
Wildpig
 
Posts: 529
Joined: Thu Jan 26, 2012 9:41 am

Re: The Blitzkrieg on Poland

Postby Mitch » Tue Oct 28, 2014 11:57 am

Absolutely... Wing Loading is what I am always looking at during my build. The "Holy Grail" number is .5 grams per square inch. This model is now weighing 67g w/o motor. My 109 that flew at WESTFAC IV weighs 78g w/o motor. I expect my AUW for this plane to be... well lets say 85g. With a wing area of approx. 108 sq in, that's a loading of almost .8g per sq in. That is flyable but pretty high. My Edge 540 had a wing loading of 1.0g per square inch, and she flew in a school yard. My Hellcat which is huge and heavy will have a better wing loading.

The other key factor is power supply and delivery, that is, rubber and prop. In a plane like the 109 it is a challenge to get in as much rubber as I want because the fuselage is so narrow. Radial engine planes like the FW and Zero are better.

At my first contest, I was told Guillow models do NOT win contests. Moreover Messerschmidtts do NOT win contests. I did not take this as a discouragement but as a challenge. I plan to have Guillow models at every contest and have an Me 109 in my squadron!
Image
Third Place in Mass Launch, WW II, Mediterranean Theater.

I plan my future generation Me 109's to use a built up nose and NOT use the plastic cowl like my P-51 'Miss Scarlet"
Image
Flew in WW II Mass Launch, and had engine malfunction and crashed.

Mitch

Keep Building, Keep Competing, Keep Getting Better! and always having FUN! :D

PS: My 1st generation 109 used scale wingspan, and it flies. All my competition 109's use the longer ws as shown on plans. :wink:
Mitch
 
Posts: 1347
Joined: Mon Aug 22, 2011 9:16 pm
Location: Kent, WA

Re: The Blitzkrieg on Poland

Postby David Lewis » Tue Jun 02, 2015 12:56 pm

Steve wrote: "I wonder if wing loading is constant with size of the model or if it scales with reynolds number? IOW, if an effective wing loading for a 400 series applies would be applicable to a 500 series model?"

No, actually wing loading is not a performance parameter that applies equally for different size models, even if Reynolds number is the same. A larger model can carry a higher wing loading more easily than a small model can, so as model size goes down, wing loading must ALSO go down in order to make apples-to-apples comparison.

The solution is to use cube loading instead of wing loading. Cube loading factors out scale effect and thereby makes direct comparison of wing loading between different size models possible.

Wing cube loading (or cubic wing loading) = weight/wing area^1.5

The unit of measure is M/L^3 (e.g. ounces per cubic foot)
David Lewis
 
Posts: 289
Joined: Thu Jun 13, 2013 11:47 am
Location: Orlando FL

PreviousNext

Return to General Building Questions

Who is online

Users browsing this forum: No registered users and 28 guests