I will be doing that, the fin and tailplane on mine are covered and pics taken, I just need to find the time to write it up, them move onto the wings and fuselage
Andrew
Cessna 180 Group Build
Re: Cessna 180 Group Build
![]() by Phugoid » Thu Nov 17, 2011 3:08 am
by Phugoid » Thu Nov 17, 2011 3:08 am
- Phugoid
- Posts: 952
- Joined: Wed Jan 20, 2010 8:17 am
Re: Cessna 180 Group Build
![]() by BassettsAllSorts » Thu Nov 17, 2011 4:09 am
by BassettsAllSorts » Thu Nov 17, 2011 4:09 am
I was just about to say that I'm sure Andrew will be doing that!
Thanks for putting in all the effort this has been great fun.
Tom
Thanks for putting in all the effort this has been great fun.
Tom
- BassettsAllSorts
- Posts: 121
- Joined: Wed Oct 19, 2011 1:42 pm
Re: Cessna 180 Group Build
![]() by supercruiser » Thu Nov 17, 2011 10:00 am
by supercruiser » Thu Nov 17, 2011 10:00 am
BassettsAllSorts wrote:I'll go about finishing off the model in the next few days and try to master the dreaded windscreen again.
Tom
Something you might try with the windscreen.... Make a simple frame that is the same dimensions as the window frame on the 180. This can be a very rudimentary rig. Hold the clear sheet over the frame and heat it up with a hair dryer. The reason I say make a frame and not use the airplane is because you have already covered the model. The heat may distort the tissue.
Just a thought.
- supercruiser
- Posts: 405
- Joined: Wed Jun 15, 2005 8:47 am
Re: Cessna 180 Group Build
![]() by BassettsAllSorts » Thu Nov 17, 2011 12:33 pm
by BassettsAllSorts » Thu Nov 17, 2011 12:33 pm
Hi makmov and supercruiser
The windsreen went on much better this time I did put a slight fingerprint mark of glue on the side window but overall I'm very pleased. My big fat fingers! Thanks for the tip thought supercruiser.
Your plane must be as smooth as a babies bottom.

I've really enjoyed this build.
The windsreen went on much better this time I did put a slight fingerprint mark of glue on the side window but overall I'm very pleased. My big fat fingers! Thanks for the tip thought supercruiser.
Your plane must be as smooth as a babies bottom.
I've really enjoyed this build.
Last edited by BassettsAllSorts on Fri Nov 18, 2011 4:27 am, edited 2 times in total.
- BassettsAllSorts
- Posts: 121
- Joined: Wed Oct 19, 2011 1:42 pm
Re: Cessna 180 Group Build
![]() by Phugoid » Thu Nov 17, 2011 12:38 pm
by Phugoid » Thu Nov 17, 2011 12:38 pm
BassettsAllSorts wrote:Hi makmov
Your plane must be as smooth as a babies bottom.
Or non existant if you are still sanding te he
- Phugoid
- Posts: 952
- Joined: Wed Jan 20, 2010 8:17 am
Re: Cessna 180 Group Build
![]() by BassettsAllSorts » Thu Nov 17, 2011 12:45 pm
by BassettsAllSorts » Thu Nov 17, 2011 12:45 pm
Phugoid wrote:BassettsAllSorts wrote:Hi makmov
Your plane must be as smooth as a babies bottom.
Or non existant if you are still sanding te he
Or that!!!
- BassettsAllSorts
- Posts: 121
- Joined: Wed Oct 19, 2011 1:42 pm
Re: Cessna 180 Group Build
![]() by MakMov » Thu Nov 17, 2011 4:11 pm
by MakMov » Thu Nov 17, 2011 4:11 pm
It's getting there. Can't do too much sanding at one time, start going insane.  I don't have that much more to do. It's mostly been other life things getting in the way.
- MakMov
- Posts: 137
- Joined: Wed Sep 21, 2011 10:18 am
Re: Cessna 180 Group Build
![]() by ADW 123 » Thu Nov 17, 2011 5:24 pm
by ADW 123 » Thu Nov 17, 2011 5:24 pm
Tom, your plane looks good. No doubt, if you get some decent rubber in there you will get some flights.
I might suggest a couple things to get rid of those annoying wrinkles on the LE of your plane.
I built the 95 last winter, and I added 1/16" stringer on the LE of the wing, to help take care of those wrinkles. No doubt the 180 has plenty of lift to handle that kind of mod.
I then sanded down the front of the rib to blend EVENLY with the 1/16" stringer i added.
OR, you could sand down the LE and not add any extra wood, which works well for me.
thats a picture of my Wulf that i build not too long ago. You can see that the forward rib has been sanded flat with my sanding block to blend/meet with the LE. Like i said, this works very well for me. You can also apply these same concepts to the rear parts of the ribs. So, the forward part of your wing rib on the 180 is the top of the rib that is in front of that forward stringer. everything that is considered the back is behind that. What I have described here can be applied to many parts of the plane, so see if you can make some sense of it.
It is all about structure! It takes a flawless structure to produce a flawless covering job. That is how i put it to a couple of my friends who i am teached to build these things. The covering wont be great until you can build the structures well. It all takes practice. Soon, you will be able to build the structures flawlessly in your sleep! When I build the 500 series and the 95 and 180, I hardly have to read instructions, besides for placing parts. You get so used to the procedure you just know what, when and how.
That being said, you should keep on this track. That goes for everyone who is trying. Like Phugoid says, an odd wrinkle wont stop it from flying. Its about making a model you are proud of. If you arent, Its time to get another one and try again. The models I have seen here on this thread so far, you should be proud of. Tom, I realized adressed this originally to you, but some of the stuff I have said goes for everyone as well as yourself. Keep it up.
- ADW 123
- Posts: 1158
- Joined: Mon Feb 22, 2010 5:22 pm
- Location: Cincinnati, Ohio
Re: Cessna 180 Group Build
![]() by BassettsAllSorts » Fri Nov 18, 2011 4:54 am
by BassettsAllSorts » Fri Nov 18, 2011 4:54 am
Hi ADW
Thank you for the information and the kind comments. That's a great idea of adding 1/16" stringer on the LE of the wing, I'll certainly think about giving that a a go.
That is what makes this forum really great - the information in previous posts and ones from you guys is brilliant especially with the pictures as a guide. It really allows you to learn and discuss all things guillow's.
I'm really pleased with this one. This is only my third plane but second seriously taking into account the advice on here and I feel that I am definitely on the right track. I think I have the sanding of the ribs on the trailing edge down as I get it flush with the edge. Although I sand to make sure its flush with the leading edge I think I need to take more time to make sure the whole from curve is in proportion. I'll definitely use your information as reference the next time I'm ready for covering.
If you could just build these babies perfect from the word go it just wouldn't make it interesting. As frustrating as it is when a part doesn't quite fit because of the die cut, there is something great about thinking of a fix to make it work!
I have a couple of questions if that's OK.
What sanding paper grade do you guys use for sanding/finishing?
Will the 3/16" rubber that I bought for the 95 be good enough for the cessna?
I am proud of the models I have built and I'll keep striving for the perfect structure and covering job. In all honesty I just love putting them together. I am going to try my hand at painting one soon and see how I fare with that.
I also cannot wait to scratch build one with light grade balsa.
Thanks again ADW your posts really help.
Tom
- BassettsAllSorts
- Posts: 121
- Joined: Wed Oct 19, 2011 1:42 pm
Re: Cessna 180 Group Build
![]() by ADW 123 » Fri Nov 18, 2011 9:02 am
by ADW 123 » Fri Nov 18, 2011 9:02 am
Go to the store and get a bunch of sand paper in a few different grades. Remember its balsa wood so be gentle. 3/16 will work for rubber. I used 1/8 inch rubber for min 1.25 times hook to peg length and I got 25 second flights with my 95
- ADW 123
- Posts: 1158
- Joined: Mon Feb 22, 2010 5:22 pm
- Location: Cincinnati, Ohio
Re: Cessna 180 Group Build
![]() by BassettsAllSorts » Fri Nov 18, 2011 9:09 am
by BassettsAllSorts » Fri Nov 18, 2011 9:09 am
Thanks ADW
I've got a couple of grades (Can't think what they are but they are fine grade).
Glad the rubber I bought will be suitable.
Looking forward to trying the cessna out.
Tom
I've got a couple of grades (Can't think what they are but they are fine grade).
Glad the rubber I bought will be suitable.
Looking forward to trying the cessna out.
Tom
- BassettsAllSorts
- Posts: 121
- Joined: Wed Oct 19, 2011 1:42 pm
Re: Cessna 180 Group Build
![]() by BassettsAllSorts » Fri Nov 18, 2011 10:11 am
by BassettsAllSorts » Fri Nov 18, 2011 10:11 am
David Duckett wrote:Sandpaper has been described as a modeler's best friend and worst enemy. I use only wet/dry, also called waterproof, sandpaper and while I have several other grades in regular stuff, they are rarely used. Unless you're working with plywood, you really need only three grits which are 220b, 320b, and 400b. 220b will do most of the sanding required for a Guillows model, even one totally wooded as mine tend to be. Once a surface is doped I use 320b to sand it smooth and do that after each coat of dope. 400b will make an even smoother surface, I guess, but I rarely use it because after a point, it's smooth enough for me.
The reason for using wet/dry paper is that it is far more flexble than regular paper which can easily crack and a jagged edge can be dangerous to you and the wood. I use a couple of sanding blocks and a couple of T bar sanders in building but I also do a lot of sanding with the sandpaper cupped in my hand or wrapped around a finger and regular sandpaper doesn't conform to the contours of the hand as easily as does the wet/dry version.
The enemy part is that you can easily sand it all away so obviously you need to be careful. The new laser cut kits with their dark edges clearly show what the shape should be and what should not be sanded away. To that end I often use a magic marker type pen to outline the edges of a part so that I do not indeed make sawdust of it all.
Hi David
That's fantastic information thank you very much.
I bought some wet/dry paper so I'm on the right track and I have been getting a good finish on the models before covering I was just interested in the experienced builders on here. I'll look into getting the grades that you have recommended.
It would be bad if you sanded too much and caused havoc with the structure (Sounds like the sort of thing I would do).
The trouble I am having is that the model shops that I have near me are not experts in free flight balsa models like the guillow's kits. I have had such bad information from each shop I go to that I didn't know who to believe. Things like don't thin dope or weigh it down, theres no such thing as non shrinking dope, they don't make coloured tissue any more, don't use glue sticks or PVA and lots lots more. I had one guy shout at me saying I'm not good enough to make them as I have not done it before and why am I bothering. I explained that the only way to get good is to build but I left the shop thinking no more of my hard earned money would be going in his pockets!! No wonder people are not making the planes like they used to. Anyway I am getting into a rant so I'll move it along
Good job this forum is available to get help and advice.
Thanks again David.
Tom
- BassettsAllSorts
- Posts: 121
- Joined: Wed Oct 19, 2011 1:42 pm
Re: Cessna 180 Group Build
![]() by Phugoid » Fri Nov 18, 2011 1:39 pm
by Phugoid » Fri Nov 18, 2011 1:39 pm
Hi Tom,
I have a feeling that the american grades of paper might not be the same as ours in the UK.
One side (the light side) of my alumimium block is 120 grit aluminium oxide, the other side is 400 grit wet or dry paper, then I use 800 grit or 1000 grit wet or dry with fingers only for the final rub down after I've sealed the wood.
Your 3/16th rubber should be fine.
Andrew
- Phugoid
- Posts: 952
- Joined: Wed Jan 20, 2010 8:17 am
Re: Cessna 180 Group Build
![]() by Phugoid » Sun Nov 20, 2011 5:20 pm
by Phugoid » Sun Nov 20, 2011 5:20 pm
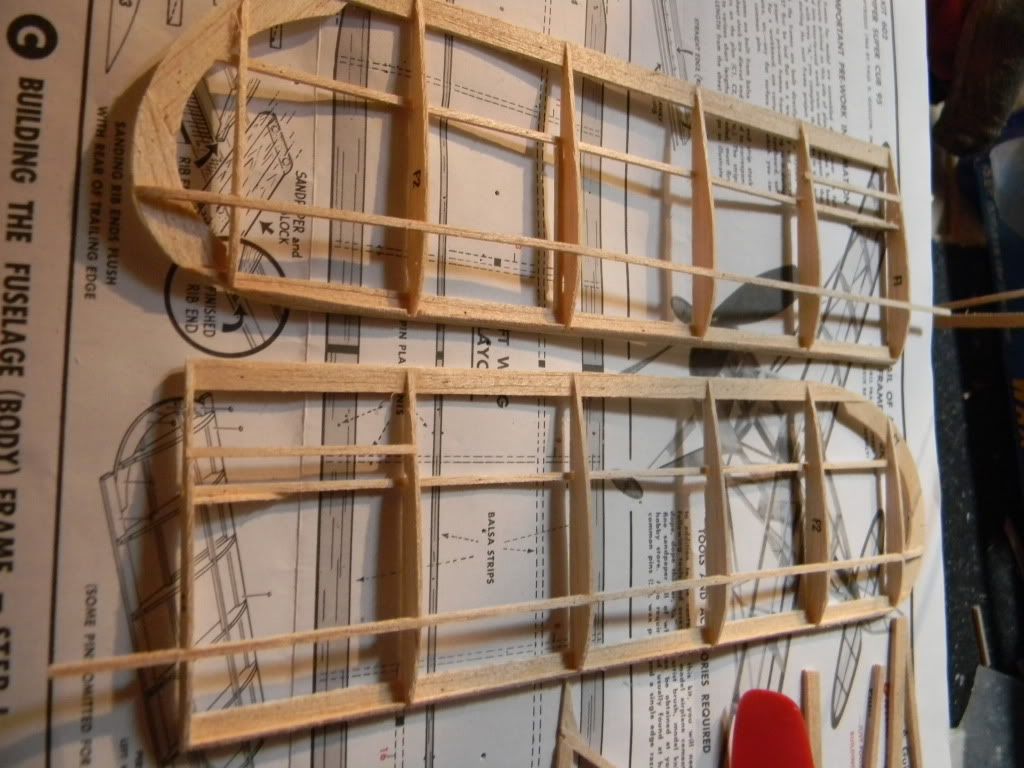
Covering:
So as a quick recap we should have all of the frames now constructed:
So as a quick recap we should have all of the frames now constructed:
- Phugoid
- Posts: 952
- Joined: Wed Jan 20, 2010 8:17 am
Return to General Building Questions
Who is online
Users browsing this forum: No registered users and 5 guests