400 Series P-51 Build

Ask other modelers for a little help / knowledge ?

400 Series P-51 Build

Postby jpuke » Thu May 23, 2013 6:00 am

You guys will have to be patient with me, I'm trying to post photos for the second time (I have no idea how I did it the first time but I'm following the DD tutorial because the "Upload attachment" wasn't working for me) so we'll see how this goes.

I bought this kit in 1998 shortly after returning from two years of missionary work in Chile, I actually bought a lot of kits in 1998 hoping I'd get to them. Life got in the way: college, marriage, kids, etc., so they all got put away until about 2011 when I remembered I had them. I managed to get a few to fly so I figured it was time to give the big kit a try. My goal was to build it close to Guillows plans but add some extras such as an adjustable nose plug, balsa spinner, sheeted nose, scalloped formers in the fuselage and other things I hadn't tried yet.

Image
Here's the fuselage, I had to laminate a few sheets of 1/16" balsa on the front because I somehow got the angle wrong on the first former but I fixed it by sanding down the laminations (you can see grain change directions near the bottom of the nose in this photo) This weighed 23 g before I sanded anything so it will likely be a heavy model.
(My modeling table is the same as my gun cleaning table and my ammo reloading table, that's why there's gun oil and bullet casting molds in the background)

Image
Here's the cowl, sans the front which I sanded off to make room for the nose plug. I doped the squared opening and nose plug with a couple coats to avoid having the wood soften when the rubber lube gets on it.

Image
Here's everything put together, the plug fits nearly perfectly into the cowl.

Image
The backwards prop shaft is just so I can pull the thing in and out before I get a prop mounted in there.

Image
Wow, my goal was to keep the whole model under 60g for the wood structure, looks like that might be a bit hard to achieve.

I wanted to make a balsa spinner, not because I needed one but because I thought it would be neat. I've made laminated cowls before rather than use the plastic ones so I figured I'd give it a try.
Image
Image
Image
Image
Here's the almost completed spinner, next to the Guillows-supplied plastic one. I know the profile isn't perfect but it's pretty close. I may try to shape it a bit more but I don't want the diameter getting any smaller.

On to the tail surfaces....
jpuke
 
Posts: 75
Joined: Wed May 04, 2011 8:03 am
Location: Lincoln, NE

Re: 400 Series P-51 Build

Postby Mitch » Thu May 23, 2013 8:44 am

That looks like very nice work. It looks like you know what your doing. Good job on the front end. I still need to get better on that myself.

My question to you is what power are you planning on using? Guillow rubber or Tan? Size of Prop? These all come into play also and just as important.

My experience showed me that this plane will fly with Guillows rubber and the supplied 7 inch prop. The Guillows rubber is not as "soft" as the tan and I believe it gives more torque and will help the model fly for a short flight. The tan will run smoother and longer, but does not seem to have the same power.

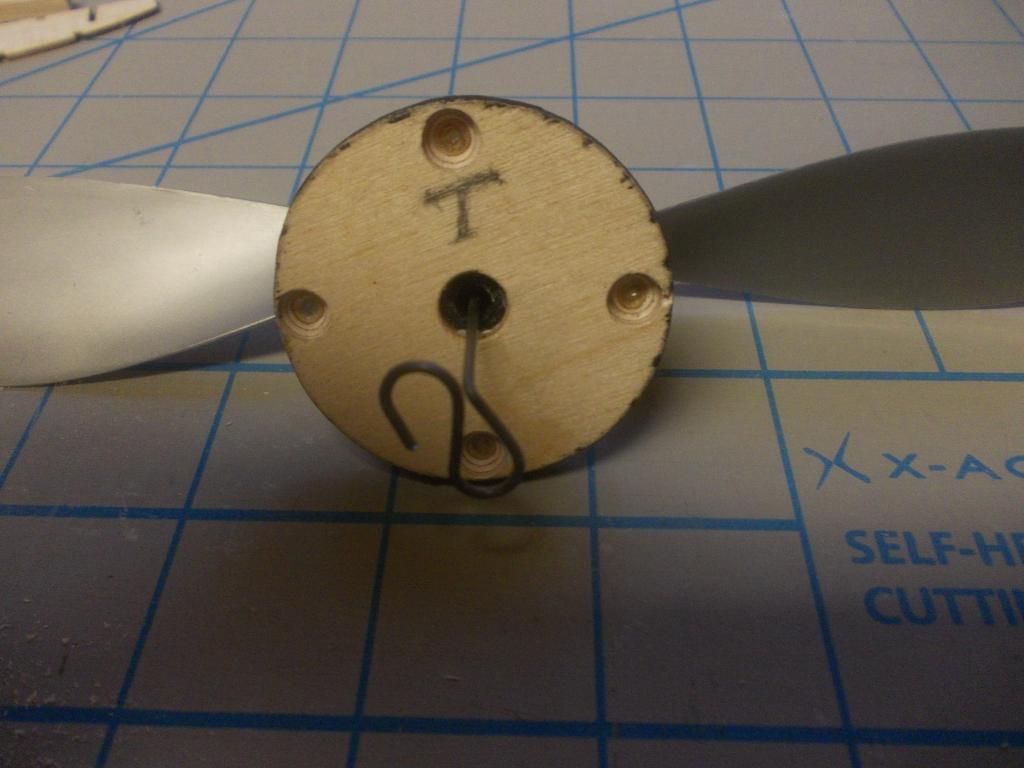
One more thing for now... If you use a lot of rubber and get in many winds the knots unwinding will do crazy things and can even "climb" off that hook. I am now making my own front hook... the reverse 8:
Image
Just food for thought...

Looks like you are doing well. looking forward to see that finished, and in the "Blue Sky"

GREAT JOB... so far, Mitch
Mitch
 
Posts: 1347
Joined: Mon Aug 22, 2011 9:16 pm
Location: Kent, WA

Re: 400 Series P-51 Build

Postby jpuke » Thu May 23, 2013 9:24 am

I picked up a 9.5" Peck prop and plan on trying out a Crocket Hook or one of the T-hooks I've seen online along with some small dental rubber bands to keep the rubber on the hook. You left a link for starlink-flitetech and I plan on ordering some blast tubes and other items to go along with this. I have about 75' of 1/4" Sig Tan Rubber that I picked up years ago as well as a bunch of 1/8" and 3/16" from Peck if needed. (I figured the 1/4" would be necessary for a plane this heavy)
jpuke
 
Posts: 75
Joined: Wed May 04, 2011 8:03 am
Location: Lincoln, NE

Re: 400 Series P-51 Build

Postby Mitch » Thu May 23, 2013 8:56 pm

Sounds like you know what your doing... I'll check in latter. If you have any comments on my FW190-A3 rebuild let me know... If I do not get better flights with my new wing, I'll go up to a 9-1/2 inch prop also. I just think once you get these birds up there... I want to keep it in the schoolyard....Mitch
Mitch
 
Posts: 1347
Joined: Mon Aug 22, 2011 9:16 pm
Location: Kent, WA

Re: 400 Series P-51 Build

Postby Wildpig » Thu May 23, 2013 9:49 pm

nice job making the balsa spinner. The dowel: is it glued to the balsa laminations or a kind of press fit?
Wildpig
 
Posts: 529
Joined: Thu Jan 26, 2012 9:41 am

Re: 400 Series P-51 Build

Postby jpuke » Fri May 24, 2013 5:07 am

Image
I found this instruction on making a spinner at http://www.parmodels.com/Plans/Comet_Stick_Models.htm, I glued together 5 laminations, I then glued together another 5 and drilled a 3/16" hole for the dowel and then glued together another 5 and bored a 1-1/8" hole for the cavity in the middle. I glued all three sections together, using boxes of bullets to compress them while they dried, and then glued the dowel in place. I'm going to have to cut out the dowel eventually. My numbers of laminations might be off, the unfinished photos above are of my first attempt, I got greedy at one point trying to hollow out the middle and I broke it in two.

Image
I meant Crocket hook, Google tries to correct me every time I search for it by telling me I'm really looking for Crochet hooks. I stole this image from the Volare website (Shorty's Basement, I guess)
jpuke
 
Posts: 75
Joined: Wed May 04, 2011 8:03 am
Location: Lincoln, NE

Re: 400 Series P-51 Build

Postby jpuke » Mon Jun 03, 2013 8:54 am

Image
I decided to try some removable landing gear so I crushed two small lengths of aluminum tubing to allow a spot for the LG to go. The next photo shows a closer view. I got this idea from the Don Ross book.

Image

Image
I also got the tail surface framework completed.

Hoping to get it covered this week.
jpuke
 
Posts: 75
Joined: Wed May 04, 2011 8:03 am
Location: Lincoln, NE

Re: 400 Series P-51 Build

Postby Wildpig » Mon Jun 03, 2013 3:26 pm

I noticed that the leading and trailing edge pieces of the horizontal stabilizer are notched for the 1/16" square balsa. Is that your method or is that the way the kit is designed? I prefer to notch those pieces on my builds.
Wildpig
 
Posts: 529
Joined: Thu Jan 26, 2012 9:41 am

Re: 400 Series P-51 Build

Postby jpuke » Mon Jun 03, 2013 6:52 pm

I notch them. Something I started after seeing someone on this board do it.
jpuke
 
Posts: 75
Joined: Wed May 04, 2011 8:03 am
Location: Lincoln, NE

Re: 400 Series P-51 Build

Postby jpuke » Fri Jun 07, 2013 8:54 am

Image
Got started covering this week.
jpuke
 
Posts: 75
Joined: Wed May 04, 2011 8:03 am
Location: Lincoln, NE

Re: 400 Series P-51 Build

Postby Supercubber95 » Fri Jun 07, 2013 4:30 pm

Looking awesome. You've really got some creative ideas! :wink:
Who put an "S" in lisp? :P
Supercubber95
 
Posts: 218
Joined: Wed Apr 21, 2010 2:13 pm
Location: Belle Fourche, South Dakota

Re: 400 Series P-51 Build

Postby jpuke » Tue Jun 11, 2013 6:50 am

Image
Fuselage + Spinner/Prop

Image
Closer view of spinner.
I was scared to try to mate the propeller with the spinner but I used a dremel tool to carve out the groove for it. Then I glued a piece of 1/16" plywood on the back after getting the prop aligned correctly with the nose block.

Image
Spinner/Prop/noseblock as it fits in the fuselage. I was hoping for less space between the bottom of the spinner and the face of the nose block but this will do.
jpuke
 
Posts: 75
Joined: Wed May 04, 2011 8:03 am
Location: Lincoln, NE

Re: 400 Series P-51 Build

Postby Tabitha64 » Tue Jun 11, 2013 8:23 pm

Really impressed with your application of the tissue. What is your technique of applying it. I have improve my application of tissue with stick glue but would like to get it to the state of your style. Thanks. Tabitha :?:
Tabitha64
 
Posts: 33
Joined: Sun May 20, 2012 9:59 am

Re: 400 Series P-51 Build

Postby jpuke » Wed Jun 12, 2013 5:35 am

Nothing really impressive about my covering. If you want to see some good stuff, look up any of scigs30's builds.

I use glue stick and cover WET when possible. This model comes with silkspan for covering which is wonderful stuff, still strong enough when it's wet that you can pull on it carefully without tearing. The same doesn't work that well with tissue in my experience. I spray the tissue or silkspan with 50/50 isopropanol/water mix (Rubbing alcohol comes at 70% so a little math is required) and let it sit on a flat surface while I apply the glue stick to the desired area then I place the covering as tightly as possible while wet and allow it to dry.

The real key is the structure of the model itself. This one went easily because of all the extra wood. A 500 or 900 series model will be much more troublesome (especially on the wings, for me) because there is more space between ribs. Thanks for the compliment but the real trick is taking photos that don't show the parts that didn't come out great.
jpuke
 
Posts: 75
Joined: Wed May 04, 2011 8:03 am
Location: Lincoln, NE

Re: 400 Series P-51 Build

Postby Tabitha64 » Wed Jun 12, 2013 7:59 pm

Thanks. I go a lot out of what you said. You know some hobbies not like to disclose what works for them afraid they are giving away trade secrets. If I come up with a trick I will share too. :)
Tabitha64
 
Posts: 33
Joined: Sun May 20, 2012 9:59 am

Next

Return to General Building Questions

Who is online

Users browsing this forum: No registered users and 24 guests