Cessna 180 Group Build

Ask other modelers for a little help / knowledge ?

Cessna 180 Group Build

Postby Phugoid » Sat Oct 15, 2011 11:13 am

Hi Everyone.
This is the start of the Cessna 180 group build, the idea of which is to be a useful reference for any newbies and also to get a flyer from the kit contents for all of the people taking part.

I suggested the Cessna 180 kit as it is a simple build, will turn out light enough to fly even with the heavy wood that can be found in the kits, and is a high winger so it should be stable and simple to trim.
Anyone is free to join in with the build at any time and ask and answer questions as we go along.

I will of course do things the way I like to do them, and with the tools and supplies I’ve got to hand, but of course (as with so many things) it’s not the ONLY way of doing things, so I’m relying on other builders to chime in with their methods and suggestions too.

Because this could be used as a reference, I’ll start at the very beginning with the tools you’ll need, since most that have signed up have built before this will perhaps be a bit tedious, but it gives you a bit of notice to start getting ready!

Here we go..
Phugoid
 
Posts: 893
Joined: Wed Jan 20, 2010 8:17 am

Tools and Things We'll need

Postby Phugoid » Sat Oct 15, 2011 11:21 am

Image

Here is pretty well the tools that you’ll need, all fairly self explanatory. For most cutting I use a scalpel with 10A blades, an Exacto knife or similar would be fine. I use a cork to put on the end to stop me jabbing myself with it accidentally whilst it’s in my tool box. I use razor blades for two things, for cutting tissue and for cutting the thin balsa strips in the kit. There are two as I rotate them, first I used them to cut tissue, and when the edge starts to get dull I “demote” them down to cutting strips before finally disposing of them.

The light coloured rectangular piece (1.25” x 4.5”) is a sanding block. This is a piece of flat aluminium with 120 grit sandpaper on one side and 600 grit on the other, a piece of plywood etc would do just fine. Next to that is an engineer’s square, this is an expensive tool that I have because of my job, but a set square from a maths set would do fine. Under that is 1000 grit paper (just loose).
The brushes are various sizes for the various jobs we’ll need to do. The smallest will be used for applying glue for the tissue, the medium one for applying sealer to the balsa frame, and the largest for applying dope to seal the tissue.

I have two sets of pins. One set are just sewing pins, nothing special. The others are nice purpose made pins that have a collar that can be slid down to hold things in place. These are available from Peck in the US and SAMS in the UK As an alternative a standard pin can be used and a piece of scrap wood slid down it.

Image

Under all of the tools is a self healing cutting mat. DO NOT use a piece of softwood as a cutting surface, as you can often find yourself following the grain in the wood instead of the line you want, and also the surface is too soft making cross cuts raggedy and likely to split.

Under the cutting mat is my building board. This is a piece of softwood, which is flat and soft and grips the pins. Mine is around 24” x 16” but anything big enough to pin down the largest part on the plan is fine. Some people using ceiling tiles, cork, thick cardboard etc. Whatever you use remember that it needs to grip the pins and keep things nice and flat.
Phugoid
 
Posts: 893
Joined: Wed Jan 20, 2010 8:17 am

Postby MakMov » Sat Oct 15, 2011 1:55 pm

Me I am going a little different route and build on a magnetic bench.

Otherwise, I use the same tools pretty much.

Exacto #11
Single sided razor blades
couple different metal rulers.
Sqaures
Pair of good titanium scissors
Brushes
And I like the foam sanding blocks.

Image

Other things I like to use is

White glue, glue sticks, Title bond II, Sig Nitrate Dope, alcohol, jewler saw, razor saw, donno if I will need for this but also a fusealage jig.
MakMov
 
Posts: 136
Joined: Wed Sep 21, 2011 10:18 am

Postby StefanJ » Sun Oct 16, 2011 12:11 am

I have a "lesson learned" trick I'd like to pass on.

After using the wrong-sized strips in various parts of my Cessna, and also running out of certain piece, I started my (currently stalled) Arrow build by carefully sizing and sorting out the strips into neat bundles:

Image

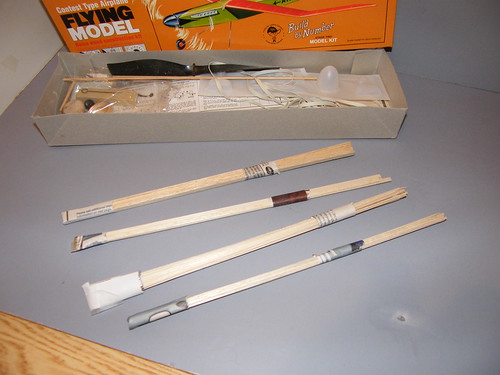
The bundles have end caps and wraps made of paper and scotch tape. Having the right piece at the right time will reduce a lot of confusion and misery.

(I finally glued the wings on my Cessna 180 this afternoon and will post a picture later in the thread.)
StefanJ
 
Posts: 103
Joined: Mon Feb 28, 2011 9:46 am

The kit.

Postby Phugoid » Sun Oct 16, 2011 10:08 am

Thanks for your input guys....

The Kit

This kit is pretty comprehensive and very good value for money. The only really poor thing about it is the rubber. The rubber is simply not stretchy enough to be able to get sufficient winds in for a decent length flight. This model should be capable of at least a 30s or so flight with some decent rubber.

Other than that it’s just niggles really. The tissue is boring colours and the die cutting is not very accurate especially in relation to the notches for the 1/16” strips, and the wood is a bit on the heavy side, especially the strip BUT this makes it better for the beginner as it will more likely survive trimming glitches and knocks.

The propeller is a reasonable size (why Guillow’s don’t put this sized one on some of the other kits I really don’t know!?) The hard work with the pliers is done since it’s already fitted to the bushing and the shaft bent over nice and neatly. This convenience also stretches over to the under cart wire which is pre bent. The gauge is a little heavy for a model of this size, but it will survive knock and bangs well.

The wheels are simple, but light. There is a nice decal sheet which will brighten up the model.

Image

Other than the rubber I’m going to use the kit contents exclusively. The only other things I’ll use will be stuff that will probably be in the kitchen drawer, garage, or office, or available at your local hardware store.

There a few other things that you will need mainly adhesives and sealants, however the only thing that you will need now, and during the majority of the build is some glue.

I use PVA (white glue) exclusively for balsa joints and for attaching the tissue. You can use cyanoacrylate adhesive CA (known in the UK as superglue) for joining balsa, but I’m not a big fan of it for building in general as it is heavy and hard to sand (amongst other things) BUT it will join balsa and metal and some of the other dissimilar materials during the build. It is obviously quicker to build with CA when compared with white glue, but I prefer the longer time to make adjustments, and it makes me take my time and not hurry.

As for the materials to seal the tissue we will look at this much later in the build.

For interest sake I’m weighing the wood as it is in the sheets just to get a frame of reference for the weight. I’ll weigh it again during various stages of the build to give anyone a reasonable estimate of the final weight of the build.

In order to get a flier we will need to keep the AUW less than around 35g including rubber and any nose weight we may need.

The wood in my kit weighs a total of nearly 24g. I think that the final weight of the frames should end up at around ¾ of this at around 18g. This is taking into account the waste around the die cuts and the fact that Guillows always supply a generous amount of strip.

Image
Phugoid
 
Posts: 893
Joined: Wed Jan 20, 2010 8:17 am

Making a Start

Postby Phugoid » Sun Oct 16, 2011 10:21 am

Making a start
To release the parts from the die cut sheets is the first thing that can be done. DO NOT try to simply push the parts out of the sheets, it won’t work since parts are deliberately not cut through completely around the profile to stop them falling out during manufacture, and also the dies don’t always seem to cut all the way through. Forcing the parts out will inevitably mean that they will get split, have raggedy edges or worse still break into pieces.

The first thing to do is to give the backs of the sheets a very light sanding. This helps to release the parts where the die has not gone all of the way through.

Image

Then by carefully flexing the sheets you can see where each part may have a “tag” of uncut balsa that needs to be cut to release it. Work your way around the sheets releasing the parts gently.

Do not force any pieces out, if it won’t budge carefully look for areas where it is retained and cut through with your knife or scalpel, a few steady and gentle cuts is less likely to cause splits and breakages, take your time.

Image

When you have cut out all of the parts then it’s an idea to group them by letter and store them in an organised way until you need them. I hold mine in bags pinned to a board in front of where I work, but anything will do to help stop them being lost or damaged. If any of the parts have split or broken, fix them now so the bits don’t get lost. Carefully cut out any notches in the parts, again light small cuts a little at a time will yield neater results.

Image

At this point you will end up with the sheets, less all of the parts, check them carefully to ensure you haven’t missed anything. DO NOT throw this "scrap" away. Keep it for now as we will need small scrap pieces to fill gaps and make strengthening gussets later in the build.
Phugoid
 
Posts: 893
Joined: Wed Jan 20, 2010 8:17 am

Cutting the Strip Out

Postby Phugoid » Sun Oct 16, 2011 11:47 am

Cutting the strip Out.

There are four different sizes of strip provided in the kit all 1/16” thick and provided in wide pieces that have been slit along their length. The sizes approximate to 1/16”, 3/32”, 3/16” and ¼”. There is plenty of each type and the length is far greater than the longest member required in the kit.

The only problem I found is that the ¼” size is around 1/32” shy of the size it should be and the section shown on the plan is even wider than that, and this will leave the wings a little bit narrower than that shown on the plan as it forms both the leading and trailing edges.

In general the wood sizes shown in the plan are bigger than they are in reality. This lack of correct scale could be confusing as to which way to jump on the sizes, so be careful. We’ll come to what size to use where as we go along.

Contrary to the kit instructions I just cut across the pieces at the last “fully cut” part to release them from the sheets. To be honest the amount that you loose this way is trivial and it’s not worth the effort to try and cut the last bit level with the machine cut part as shown in the instructions.

I use my razor for this, cutting straight across, It only takes 5 minutes or so to do. Stefan J’s Idea is a really good one - try and keep the sizes together in a “pack” to avoid confusion later on.

Image

Ok that's a start. I'll post some more progress later in the week.

Andrew
Phugoid
 
Posts: 893
Joined: Wed Jan 20, 2010 8:17 am

Postby StefanJ » Sun Oct 16, 2011 2:55 pm

I like the idea of bagging the pieces by section and tacking them to a bulletin board.

I've (ahem) "salvaged" several large bulletin boards that folks moving out of their apartments left behind. (One had a few dollars in postage stamps as a bonus.)

Since I only plan on working on one model at a time, I can use the other for organizing the parts!
StefanJ
 
Posts: 103
Joined: Mon Feb 28, 2011 9:46 am

Postby MakMov » Sun Oct 16, 2011 3:09 pm

my wood was about 22g

Image
MakMov
 
Posts: 136
Joined: Wed Sep 21, 2011 10:18 am

Postby cutter » Sun Oct 16, 2011 3:29 pm

If anyone is interested Amazon.com sells gram scales for about $10.00 .
cutter
 
Posts: 37
Joined: Thu Oct 06, 2011 10:45 am
Location: New Jersey

Postby MakMov » Sun Oct 16, 2011 4:02 pm

I think I got mine off Ebay for real cheap too. Also I seen them in Harbor Freight.
MakMov
 
Posts: 136
Joined: Wed Sep 21, 2011 10:18 am

Postby Squishyp38 » Sun Oct 16, 2011 7:14 pm

MakMov, what is that plane in the background of your workbench picture?
The P-38 is arguably the best... Forget that, it is THE BEST fighter of world war two, and is epically AWESOME!
Squishyp38
Squishyp38
 
Posts: 240
Joined: Sun Feb 27, 2011 8:08 pm
Location: Top Secret

Postby MakMov » Sun Oct 16, 2011 7:32 pm

That thing....

It's an old Grand Wing Servo (GWS) Beaver, an RC Foamy, that I am trying to finally get going. One of the few kits my wife ever bought me.

My cat decided to eat the vertical stab and the prop off it, but it's closer now to flying than it's ever been. I still have quite a bit of work to do on it, though.
MakMov
 
Posts: 136
Joined: Wed Sep 21, 2011 10:18 am

Postby MakMov » Sun Oct 16, 2011 7:34 pm

I am basically down to installing the radio gear in hooking up the linkages.
MakMov
 
Posts: 136
Joined: Wed Sep 21, 2011 10:18 am

Postby Phugoid » Mon Oct 17, 2011 2:15 am

Yeah, the bulletin board seems to work well.....

Sub 1 Gramme scales aren't essential, but the ones they sell on ebay are so cheap aren't they?

That wood is a lot lighter than mine Makmov.... so no excuse for not getting a flier?!

Andrew
Phugoid
 
Posts: 893
Joined: Wed Jan 20, 2010 8:17 am

Next

Return to General Building Questions

Who is online

Users browsing this forum: JimT and 2 guests